
study guide · containers and Docker in 13 stages
Containers and Docker
through the F1 lens.
This guide teaches, in 13 stages, the path an application takes from the laptop of the person who wrote it to a production environment, using containers. You start by understanding why containers exist and how the Linux kernel isolates processes with namespaces and cgroups; then you separate image from container, write a Dockerfile, organize layers and cache, and reduce the image size with minimal bases and multistage builds. Next you persist data with volumes, bind mounts and tmpfs, connect services by name on custom networks and describe the whole application in a single Docker Compose file, with per-environment variations, restart policy, scaling and use in CI. Finally, you reduce privileges (non-root user, capabilities, seccomp, read-only filesystem), control what goes into the build and how secrets are handled, investigate failures with a diagnostic order, check the real readiness of services with logs and healthchecks, and put everything together in a small, defensive stack. Before the stages, the next section introduces the F1 lens of the guide: a general comparison that shows the same path, from the factory to the bay, working inside a Formula 1 team.
Each stage depends only on what was explained before it and ends with a small exercise that proves you understood. Containers are learned by creating and destroying things on purpose, so do not skip the "Hands-on" blocks.
What you need to have: Docker Engine or Docker Desktop, with the docker compose command (Compose v2) available, and a terminal with curl. Confirm with docker version and docker compose version. The examples use Linux images. On Docker Desktop, those images run inside the Linux virtual machine managed by the tool itself. Some older tutorials use docker-compose (with a hyphen), the first-generation executable; in this guide we always use docker compose.
How to use this guide: keep a terminal open next to the text and organize the files in one folder per stage (etapa01/, etapa02/ and so on), because names such as Dockerfile and compose.yaml repeat. At the end of each stage, remove the lab containers, networks and volumes it created, so that ports such as 3000 and 8080 are free for the next stage. When an example shows the expected output, compare it with yours: IDs, times, sizes and versions will vary, and the structure of the output is what matters. Shortened outputs are marked with ....
What runs where: every stage runs on Docker on your own computer. Only three examples depend on something external: the docker push in Stage 02 requires a real registry with write permission, the NFS volume in Stage 05 requires an accessible NFS server, and the Dive and Snyk tools in Stage 10 must be installed separately (Snyk also requires an account). Those snippets are marked in the text and the rest of the guide does not depend on them.
About versions: images and languages evolve. The Node.js examples use the lts-alpine and lts-slim tags, which always point to the current long-term support version, so that the exercises do not age. In a real project, Stage 02 explains why pinning an explicit version is better.
The F1 lens of this guide
The car built from the sheet
A Formula 1 team does not build the car at the circuit. At the factory, the engineers write the assembly manual, the exact sequence of steps: start with this chassis (the central carbon-fiber structure where everything is attached), install this power unit (the car's engine, which combines the combustion engine and the electrical part that recovers and returns energy), then the aerodynamic package. The assembly bench receives only a crate with the necessary parts, and a list says what stays out of it (personal notes, access keys, leftovers). Following the manual, the mechanics produce a sealed kit: the car in already assembled subassemblies, each shipping crate holding the result of one step of the manual applied on top of the previous one, and without the molds and tools, which stay at the factory. If a step and its parts are identical to those of the last kit, the factory reuses the finished subassembly; if a part underneath changes, everything that goes on top of it is redone, which is why what changes every weekend goes in last. The kit stays in the team warehouse, with restricted access, and the standard parts come from supplier catalogs open to any team. Each kit carries a version label ("specification B"), which the team can later stick on another kit, and a contents list with the serial number of each part, which changes if any part changes. Logistics ships the same kit to any circuit, sending only the crates that are not yet at the destination. What varies from one circuit to another is the parameter sheet (engine maps, energy modes), delivered separately, without swapping any part.
At the circuit, the team occupies a garage in the pit lane (the lane of the garages), divided into one bay for each of the two cars the regulations allow. The mechanics take the car out of the crates and put it into operation in the bay, and it is running for as long as the engine is on. What is changed on it during the session (an adjustment made by hand, a note on the chassis) stays only on that chassis and disappears when it is taken apart. Partitions separate the bays: the mechanics of one car have their own tools, their own list of people and their own data channel, and cannot see the neighboring bay. Power, compressed air and the data network come from the same garage installation, and each bay has a circuit breaker that limits how much it can draw, so that one bay does not leave the others without power. The alternative would be to build a complete structure inside the garage, with its own generator and compressor: it isolates more, but it is heavy and slow to get ready. What needs to outlive the chassis is kept in the garage cabinets, connected to the car during the session. An engineer can also connect the car directly to a folder on their laptop, and the bay whiteboard holds what is quick and is wiped at the end of the session. Inside, cars and support systems talk over the intercom, the team's internal radio, on separate channels, and each one is called by its radio name, never by the frequency, which can change. To the outside, the garage has few points of contact, each tied to one bay; whatever has no open point can only be reached through the intercom.
Before arriving, the team writes the weekend plan: a single document with every system the garage needs (the cars, the telemetry server, the timing database), the channels and the cabinets of each, so that a single order sets everything up. The plan defines the assembly order, and assembled first does not mean ready. A companion sheet changes only what is different on a test day, and the plan also fixes the rule for a system that shuts down: always restart it, restart it only after a fault, with a maximum number of attempts, or respect whoever shut it down on purpose. At the factory, an automated test rig assembles the set with every new part, runs the tests and takes it apart. Each person gets a credential that opens only the areas they need, never the pass that opens everything, and there are requests that no bay may make to the garage installation, such as shutting off the main power board or plugging new equipment straight into the mains: the installation refuses these requests, whoever makes them. From qualifying (the session that sets the starting order), the car stays in parc fermé, the regime of the regulations in which it is sealed and cannot be modified, with interventions only at permitted points. Access codes arrive in an envelope, to the right person; a code written on a part during assembly remains recorded in the kit even if a later step covers it. During the session, each car sends telemetry (the sensor data, transmitted continuously) in a fixed format to the team servers. The race engineer (who follows one car) makes, from time to time, the radio check, the routine radio call that confirms the car responds and can follow the plan, which says more than seeing the engine running; on the out lap (the first one, with tires and brakes still cold), a bad answer does not count yet. When a car stops, the investigation follows an order: the state and the recorded reason for the stop, the data recorded by the car itself, the sheet of what was assembled, the garage timeline, the consumption and, only then, a laptop connected to the car.
It is the same chain that Docker follows. The garage is the host and the shared installation is the shared kernel; the partitions between the bays are the namespaces and the circuit breaker of each bay is the cgroup. The sealed kit is the image, and the car running in the bay is the container. The assembly manual is the Dockerfile, and each crate in the kit is a layer of the image. The garage cabinets are the volumes. Each intercom channel is a custom network, and the radio name is the internal DNS. The weekend plan is the Docker Compose file. The credential that opens only some areas and parc fermé are least privilege applied to the container, and the envelope is the secret. The radio check is the healthcheck. One fixed rule holds for the whole guide: each car taken out of the crates and put into operation in a bay is a container. The kit in the warehouse is never altered, and whoever wants a different car changes the manual and produces another kit.
If you have already read the Kubernetes guides: here the guide looks at a single garage, without the pit wall (the gantry facing the track, where the engineers who decide sit), and you give each order directly with the docker command. In the Kubernetes guides, the car becomes the Pod, and the container becomes one of the systems inside it.
The terms in plain words
54
The table below translates each technical term in the guide into an everyday idea, with no F1 and no jargon. You do not need to memorize it; come back to it whenever a term shows up in the text.
| Technical term | In plain words |
|---|---|
| Container | A hotel room occupied by a program: it uses only what is inside the room and cannot see the other rooms, but the building (plumbing, power) is shared. |
| Kernel | The building's control center that supplies power, water and a front desk to all the rooms at once. Every container on a computer uses the same one. |
| Host | The real computer (or server) where the containers run, that is, the whole building. |
| Virtual machine (VM) | A whole, independent house, with its own electrical and plumbing systems, built inside the building. It isolates well, but it is heavy and takes longer to get ready than a room. |
| Namespace | The walls of the room: they define what each program can see (which processes, which network, which files, which name). |
| Cgroup | The meter with a limit in each room: it defines how much processing, memory and disk that program can use. |
| Main process (PID 1) | The first program the container starts, the one in charge of the room: when it leaves, the room is closed. Since it is the one that receives the building's notices (such as "stop now"), it needs to know how to react to them; an "init" is a receptionist who takes that post and passes the notices on to the program. |
| Image | The ready, sealed model room, assembled by following the recipe: floor plan, furniture and everything the room needs. Each real room (container) is a copy of it, and changing one room does not alter the model. |
| Registry and Docker Hub | A library of model rooms on the internet, from which you download the ones you need. Docker Hub is the best-known public library; there are also private libraries, only for those with a password. |
| Tag | The version label stuck on the model, such as "edition 2". Whoever labels it can later move the label from one model to another. |
| Digest | The printed serial number of the exact contents of the model. If a detail changes, the number changes, which is why it identifies without ambiguity. |
| Writable layer | The room's notepad. The notes are still there when the guest leaves and comes back (stopping and restarting the container) and only vanish when the room is dismantled, that is, when the container is removed. |
| Dockerfile | The written recipe: the list of steps to assemble the model room ("start with this, add that, run this command"), so that anyone can repeat the same result. |
| Build | The act of following the Dockerfile recipe, step by step, to produce the model room. |
| EXPOSE | A sign on the room's door saying "I serve on port 3000". The sign informs, but does not open the door to the public; what opens it is port publishing. |
| Image layer | Stacked transparent sheets: each step of the recipe adds a sheet on top, and the sheets underneath do not change. |
| Build cache | If a step of the recipe and its materials are identical to last time's, Docker reuses the part that was already finished instead of redoing it. |
| Base image (alpine, slim, distroless) | The starting point of the recipe. Alpine is a tiny base room with few pieces of furniture; slim is a reduced but familiar room; distroless has only what the guest needs and no supporting furniture. |
| Multistage build | Assembling the room in a workshop full of tools and delivering only the finished room, without the tools. |
| Volume | A cabinet kept outside the room: the room can be replaced, and the cabinet keeps everything inside. |
| Bind mount | A door that opens straight onto a folder on your computer, so that what changes on one side shows up on the other. |
| tmpfs | A whiteboard: quick, but wiped when the meeting ends. It lives in memory and, in general, is not written to disk. |
| Custom network and internal DNS | A group chat only for the project members, in which each one is called by name and not by phone number, which can change. |
| Port publishing | Opening a service window on the building's front for the public. The other rooms stay internal. |
| Docker Compose | A single written plan that lists all the rooms on the floor, how they connect and what each one needs, to set everything up with one request. |
| Service | Each item in the Compose plan, for example "the API" or "the database". |
| depends_on | The opening order of the rooms: "open the database room before the API room". It guarantees only the opening order, not that the database is already ready to serve, unless a health check has been agreed. |
| Override | A sheet of adjustments laid over the plan: it changes only what is different in one environment (for example, opening a port only on your computer) without rewriting the whole plan. |
| Restart policy | The rule about what to do when the program stops: always reopen, reopen only if it stopped because of a fault, or respect it when you were the one who told it to stop. |
| Replica (scaling) | An identical copy of a service, like opening one more identical counter to serve more people. |
| CI (continuous integration) | An automatic helper that, at every change to the project, sets up the environment, runs the tests and takes everything down. |
| Non-root user | Giving the program an ordinary badge instead of the building's master key. If the badge is stolen, the damage is much smaller. |
| Capabilities | The master key split into dozens of small keys (open door A, start the generator). Each program receives only the keys it needs. |
| Seccomp | A list of requests the program may or may not make to the building's control center; dangerous requests are refused. |
| Least privilege | The rule of giving each person only the access needed for the task, and nothing more. |
| Read-only filesystem | A write-protected document: it can be read, but no one can change it. |
| Build context and .dockerignore | The context is the box of materials sent to whoever assembles the model room. The .dockerignore is the list of what stays out of the box (drafts, passwords, junk). |
| Secret | A password handed over in person, in an envelope, instead of written on a poster on the door. |
| Environment variable | A note pinned in the program's room: it reads it when it needs to, but anyone who inspects the room can read it too. |
| ARG | A parameter given at the moment of following the recipe (such as the version number). It is recorded in the assembly history, so it is not suitable for passwords. |
| Vulnerability (CVE) | A security flaw already cataloged and given a registration number, like a product recall. |
| Dive and Snyk | Two magnifying glasses: one shows what each sheet of the image added and how much it weighs; the other looks for already known security flaws. |
| Exit code | The number a program leaves when it finishes: 0 means "I finished fine" and any other number indicates that something went wrong. |
| OOMKilled and code 137 | OOMKilled is the record that the container was ended for asking for more memory than allowed (OOM means "out of memory"). 137 is the number left by a forced shutdown; this happens because of lack of memory, but also when a polite request to stop is not answered in time. |
| Inspect | Asking for the complete technical sheet of a container: what it runs, what is mounted, which network it is on and how it ended. |
| Event | The line in Docker's diary that records each occurrence (created, started, stopped, removed), with the time. |
| Log (stdout and stderr) | The diary the program writes by itself while it works. Stdout receives the normal messages and stderr receives the errors. |
| Structured log | A diary in which every entry always follows the same form (time, level, message), which makes it easy to search and filter. |
| Healthcheck | Asking from time to time "can you serve right now?", instead of just checking whether the light on the counter is on. |
| start_period | The grace period right after the container comes up: during this period, negative answers do not count as failures, because the program is still settling in. |
| Readiness | Being truly able to serve, and not just switched on. |
| Stack | The complete set of pieces that make up a working application (API, database, network, storage). |
| Resource limit | A consumption ceiling: the program may use up to so much memory and processing, but that does not guarantee it will have that much reserved. |
| Label | An informational tag stuck on the container, used to organize and search. It describes and protects nothing. |
Where the comparison stops
13
The comparison helps fix the path from the factory to the bay, but it is not a perfect equivalence. These are the points where F1 stops applying for each stage:
- Stage 01: the car is a complete machine and the partitions are physical walls; the container is just an ordinary process of the host, which the kernel sees and can end like any other, and the isolation is a configuration of that same kernel, not a physical barrier. A fault in the shared kernel affects all the containers at the same time.
- Stage 02: a physical kit becomes a single car, and assembling consumes the parts; an image produces as many containers as are requested, at the same time, without being used up, and removing the containers does not remove the image. The digest, moreover, is calculated from the content itself by a hash function, and not assigned by someone as a serial number.
- Stage 03: the assembly manual is read by mechanics who resolve ambiguities; the Dockerfile is executed to the letter, only sees the files in the build context, and
EXPOSEmerely documents the port, without opening any point of contact to the outside (the published port). - Stage 04: at the factory, deciding whether a finished subassembly (a cached layer) can be reused is an engineering judgment; in the build, the cache depends on an exact comparison of the instruction and the input files, and any difference invalidates that layer and all the following ones, even with no practical effect. And deleting a file in a later step does not make the kit lighter: the layer that added it remains in the image.
- Stage 05: the cabinets are furniture separate from the car; the volume is a host directory mounted inside the container, and the bind mount gives the container write access to a real folder on the host, with its permissions, with no safe parallel in the garage. A remote NFS volume also depends on the network and on the server's permissions, and not only on Docker.
- Stage 06: on the intercom, everyone on the channel hears every message; on a Docker network, each container has its own IP and the connections are point to point. Only custom networks resolve names (the default bridge does not), and
hostmode eliminates network isolation, with no equivalent on a radio channel. - Stage 07: the weekend plan is carried out by people who wait for one system to be ready before assembling the next; the simple
depends_ononly guarantees the creation order, and Compose only waits for readiness when there is a healthcheck and theservice_healthycondition declared. - Stage 08: the regulations fix two cars;
--scalecreates as many identical replicas as requested, limited by the host and by the fixed published port, which only one replica can occupy. And the restart rule (the restart policy) reacts only to the end of the process: a system that stays on without responding is not restarted by it. - Stage 09: in parc fermé (the read-only root), people check the seals and judge exceptions; in the container,
--read-only,--cap-dropand seccomp are applied by the kernel on every operation, with no room for interpretation. Moreover, by default the container runs as root, which is equivalent to handing over the pass that opens everything (the root user) until someone configures another user, and mountingdocker.sockin a container gives it command of all the bays in the garage. - Stage 10: an envelope handed over in person exists only for the one who received it; a Compose secret is a file in
/run/secretsthat any process in the container with read permission can see. And a code that went into an image layer stays in the history even when covered by a later step, and only disappears when the image is rebuilt without it. - Stage 11: an engineer can connect a laptop (the
docker exec) to a car stopped in the garage;docker execonly works with the container running, and an ended container leaves only state, exit code, logs and metadata. The circuit breaker of each bay cuts everything at once, while the cgroup treats resources differently: excess CPU only slows the process down, and it is excess memory that leads to the shutdown marked asOOMKilled. - Stage 12: the radio check is made by a person who understands the answer; the healthcheck runs a command, looks only at the exit code and proves only what the test examines. Without an orchestrator, the
unhealthystate is recorded, but Docker does not restart or replace the container because of it. And telemetry (the logs) always goes to the team servers, whereasdocker logsreads what stayed on the host and logs tend to be lost when the container is removed, unless they are centralized. - Stage 13: in the garage, people make up for an item forgotten in the weekend plan (the Compose file); in the stack, each protection only counts if it is declared in the file. The CPU and memory limits work like the circuit breaker of each bay, containing consumption without reserving capacity for the service, and labels are inventory tags, like those on the crates, and not seals: they describe and protect nothing.
Stage 01 foundations
Why containers exist
The problem
A Node.js application works on the team's laptop but fails on the server. The local machine uses one version of the language, the server uses another, a native library is missing and a setting was made by hand, without documentation. The deploy becomes an attempt to rebuild, step by step, an environment that exists only in the memory of whoever configured it.
The same strain shows up in other situations. Installing packages and adjusting permissions directly on the server is slow and hard to reproduce, and any small change can break everything. Starting a second instance of the application requires copying and configuring everything again on another machine. And, if the new version has a problem, going back to the previous one means reconfiguring everything or hoping a working backup exists.
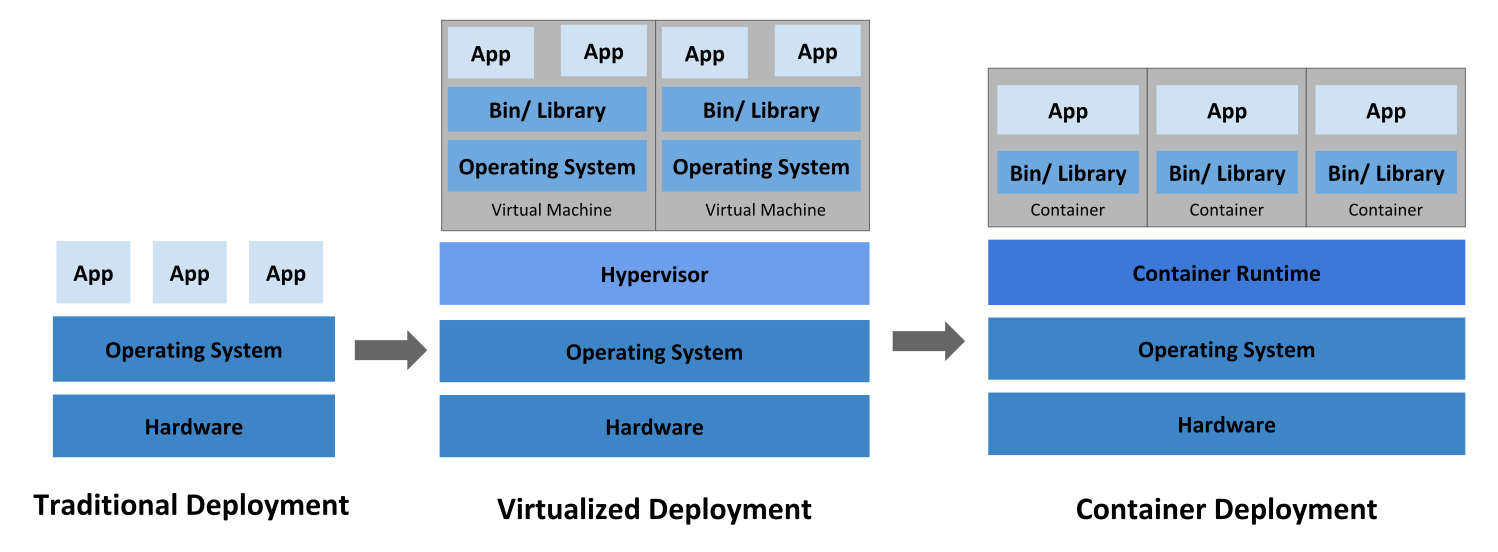
Virtual machines (VMs) improved isolation in this scenario, but each VM carries its own complete operating system. That costs memory, disk and startup time. When the goal is to run isolated applications on the same server, repeating a whole operating system for each one can be wasteful.
The concept
The evolution went like this: first, one application per physical server, with manual configuration; then virtualization, which divides a server into several VMs; finally, containers, which isolate only the processes and share the kernel of the host operating system. The focus shifts from the machine to the application.
A container is a set of processes isolated at the operating system level. On Linux, two kernel mechanisms make this possible:
- Namespaces control what the process can see. There is one type for each resource: PID (the process list), network (interfaces and routing tables), mount (filesystem), UTS (hostname), IPC (communication between processes, such as queues and shared memory) and user (user and group identification).
- Cgroups (control groups) measure and limit resources, such as CPU, memory and disk input and output operations. A container that tries to consume more than planned is held to what was defined, and this protects the others.
The container shares the host kernel. That is why it usually starts faster and uses fewer resources than a VM. This sharing also means that a container is neither a synonym for a virtual machine nor an absolute security barrier: protection depends on the configuration of the runtime and the host (Stage 09 goes deeper into this).
Docker is the tool that made containers accessible: it standardizes how to package, distribute and run. A packaged application runs the same way on your laptop, on the test server, in production or in the cloud, which eliminates the "it works on my machine" problem.
Key concepts
Container
processes isolated and limited by the kernel; it lives only as long as its main process is active.
Shared kernel
the central difference from a VM and the reason containers are lightweight.
Namespace
isolates the view of processes, network, files, hostname, communication between processes and users.
Cgroup
measures and limits CPU, memory and disk input and output.
VM
simulates a complete computer, with its own kernel; it isolates more, but costs more.
Docker
tool that creates, packages and runs containers in a standardized way.
Worked examples
# Downloads the image, creates a container, runs its process and shows the output.$ docker run --name primeiro-container hello-world# Also lists containers that have already finished.$ docker ps --all# Shows the container's complete metadata in JSON.$ docker inspect primeiro-container# Removes the container that has already ended.$ docker rm primeiro-container# expected outputHello from Docker!...CONTAINER ID IMAGE STATUS NAMESabc123 hello-world Exited (0) ... primeiro-container
The Exited (0) status does not indicate a failure. The main process printed the message and finished successfully. A container stays running only as long as its main process stays active.
Essential commands for this stage
docker ps -a): also lists stopped containersHands-on
- Run
docker run --name fundamentos hello-world. - Run
docker psand thendocker ps --all. - Note that the container appears only in the second command.
- Inspect its status with
docker inspect --format '{{.State.Status}} {{.State.ExitCode}}' fundamentos. - The expected output is
exited 0. Remove it withdocker rm fundamentos. - Run
docker run --rm alpine psand note that the only process listed has PID 1: the container does not see the host's processes. - Run
docker run --rm --hostname demo alpine hostnameand thendocker run --rm alpine hostname. Note that the name changes from one container to another, and neither of them is the name of your computer.
Tip: When a container "disappears" right after docker run, do not assume a defect: run docker ps --all and read the STATUS. An Exited (0) means the main process ended normally, and a container only stays alive while that process continues.
Takeaway: A container is a process isolated and limited by the kernel; it is not a small virtual machine.
Stage 02 image + runtime
Image, container and lifecycle
The problem
A team needs to run the same version of Nginx in development, testing and production. Installing and configuring the program manually in each environment recreates the inconsistency problem. Copying a running container is not enough either, because it accumulates temporary state and does not represent a reproducible recipe.
The concept
An image gathers the filesystem and the metadata needed to start a process. It is immutable and made of reusable layers. A container adds a temporary writable layer on top of the image and runs the configured command. The same image can give rise to several independent containers, and removing a container does not remove the image.
The basic flow is:
docker pulldownloads an image from a registry, such as Docker Hub.docker runcreates and starts a container from the image.docker stoprequests that the process stop.docker startrestarts the same container.docker rmremoves the container.docker rmiremoves an image that is not in use.
Tags such as node:lts-alpine or nginx:alpine identify variants. Avoid depending on latest in environments that need reproducibility, since the content associated with the tag can change. An explicit tag (for example, the major version) helps, although a tag can still be moved by the maintainer. When strong immutability is required, a digest (image@sha256:...) identifies the image content precisely.
A public registry lets you discover and download public images, often without authentication. Docker Hub is the best-known example and hosts both free software (Nginx, Node.js) and system bases (Ubuntu, Alpine). A private registry restricts access to internal images and requires authentication with docker login. Companies usually combine the two: common images come from the public registry, and the images that contain proprietary code stay in internal repositories, accessible only to those who are authorized. Private registry options include Amazon Elastic Container Registry (ECR), Azure Container Registry (ACR), Google Artifact Registry (which replaced the old Google Container Registry), and self-hosted solutions such as Harbor and JFrog Artifactory. They integrate with CI/CD pipelines to automate the creation and distribution of images.
Use public images only when they are trusted and verified, and keep in private repositories everything that is sensitive or internal.
Before pushing an image, the local name must receive a tag that includes the registry address, the namespace and the version.
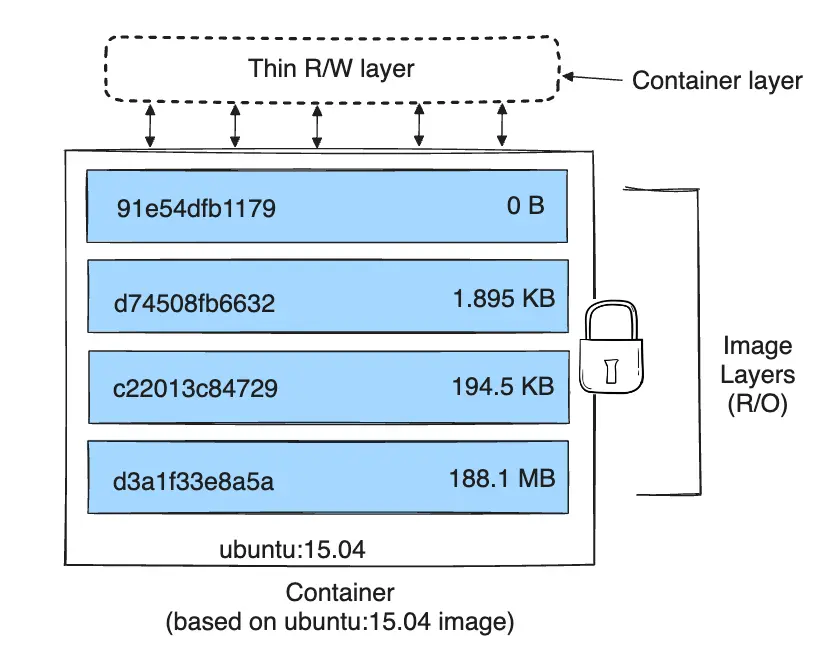
A container is the image, in read-only layers, plus a thin writable layer on top. Everything the container writes goes to that layer.
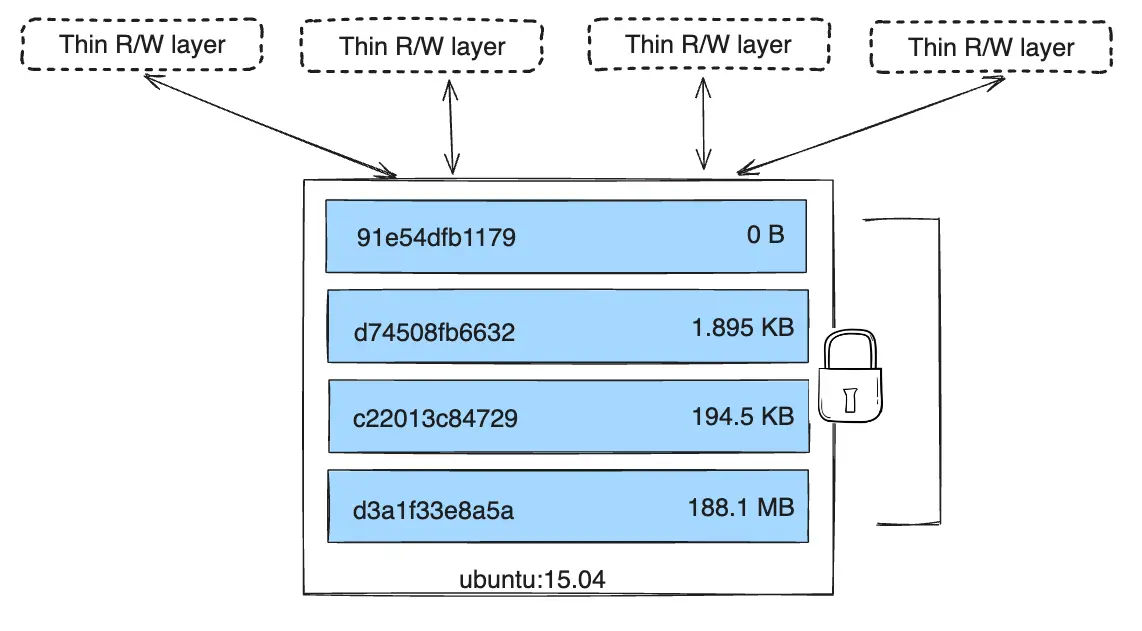
Several containers from the same image share the read-only layers, and each one has its own writable layer. Removing a container deletes only its layer.
Key concepts
Image
immutable, layered template used to create containers.
Container
execution of an image, with a temporary writable layer on top.
Writable layer
where the container writes during execution; it disappears when the container is removed.
Registry
server that stores and distributes images (Docker Hub, ECR, ACR, Artifact Registry, Harbor).
Tag
version name of an image; it is mutable, and latest does not guarantee reproducibility.
Digest
identifier of the exact content of the image.
Lifecycle
pull, run, stop, start, rm, rmi.
Worked examples
# Explicitly downloads the Alpine variant of the official image.$ docker pull nginx:alpine# Creates a container in the background.# The name makes the next commands easier.# Port 8080 on the host is forwarded to port 80 in the container.$ docker run --detach --name pagina --publish 8080:80 nginx:alpine# Lists the running containers.$ docker ps# Queries the server inside the container through the port published on the host.$ curl http://localhost:8080# Shows the messages produced by the Nginx process.$ docker logs pagina# Runs a command in a container that is already running.$ docker exec pagina nginx -v# Stops and removes the container.$ docker stop pagina$ docker rm pagina# expected outputCONTAINER ID IMAGE PORTS NAMESabc123 nginx:alpine 0.0.0.0:8080->80/tcp pagina<!DOCTYPE html><title>Welcome to nginx!</title>nginx version: nginx/...
Essential commands for this stage
docker run -it ubuntu bash)docker exec -it meu-container bash)docker tag, docker push: authenticates, names and pushes an image to a registrydocker image prune, docker system prune: remove stopped containers, unused images and all unused resources, respectively. Read the list Docker presents and confirm the scope before acceptingHands-on
- Start
nginx:alpineon port 8080 with the nameciclo. - Confirm the response with
curl -I http://localhost:8080. The first line of the output should beHTTP/1.1 200 OK. - Stop the container and repeat the
curl. The connection should fail, with a message such ascurl: (7) Failed to connect to localhost port 8080. - Run
docker start cicloand confirm that the page is back (HTTP/1.1 200 OKagain). - Confirm that no needed data lives only inside the container. Then remove it with
docker rm --force ciclo. This option stops and removes the instance immediately, so it should not be used without checking the target. - Run
docker images nginxand note that the image is still available even with no container: removing the container does not remove the image. - Make sure the file
nota.txtexists in the current folder (echo "ola do host" > nota.txt). Create a container withdocker run --detach --name caixa alpine sleep 300, copy the file into it withdocker cp nota.txt caixa:/tmp/nota.txt, read it withdocker exec caixa cat /tmp/nota.txt(the output isola do host) and remove the container withdocker rm --force caixa. Then create another one with the samedocker runand rundocker exec caixa cat /tmp/nota.txtagain. The expected output now iscat: can't open '/tmp/nota.txt': No such file or directory, because the file stayed in the writable layer of the container that was removed. Remove the second container withdocker rm --force caixa.
Tip: When you need to reproduce an image exactly, note the digest with docker images --digests and reference image@sha256:.... Tags such as latest and even stable change content over time; digests do not.
Takeaway: An image is the reproducible artifact; a container is a disposable run of that image.
Stage 03 repeatable build
Dockerfile as a reproducible recipe
The problem
Downloading a ready-made image covers common tools, but does not package your application's code. Manually copying files into a running container produces an environment that is impossible to rebuild with confidence.
The concept
The Dockerfile is a text file that describes, declaratively, the step-by-step to build an image: you say what you want and Docker builds it. The docker build command reads the Dockerfile and a folder of files (the build context, given at the end of the command, normally .) and produces an image.
The essential instructions are:
FROM: chooses the base image. Example:FROM node:lts-alpinemeans "start from the Node image on an Alpine base".WORKDIR: sets the directory used by the following instructions, to avoid long paths in each command. Example:WORKDIR /app.COPY: copies files from the build context into the image. Example:COPY . /appcopies everything in the current directory to/app.RUN: executes an action during the build (installing dependencies, creating folders) and records the result as a new layer. Example:RUN npm install.CMD: sets the default command executed when the container starts. Example:CMD ["node", "index.js"].EXPOSE: documents the port used by the application. It does not publish the port on the host.
RUN happens at build time and records a layer in the image. CMD happens at runtime, when a container is started. Mixing these two moments is a common source of error. CMD can be replaced on the docker run command line.
The order of the instructions matters because Docker caches the result of each one. If you change something at the top, everything below is rebuilt; if you change only the CMD, the rest is reused. Stage 04 explores this rule.
The main process and signals. The process defined by CMD is PID 1 of the container. On Linux, PID 1 does not get the default signal handling: a signal such as SIGTERM or SIGINT, which normally ends a program, is ignored if the program has not installed a handler for it, and Node.js without an explicit handler falls into this case. The result is that Ctrl+C in the terminal may not end the container, and docker stop waits for the deadline (10 seconds by default) and then sends SIGKILL. The --init option of docker run (and init: true in Compose) puts a small init process as PID 1, which passes the signals on to your program. That is why the API examples in this guide use --init. To end a container in the foreground, use Ctrl+C in its terminal or, in another terminal, docker stop name. The exit code 137 that results from a forced shutdown by SIGKILL does not, by itself, indicate lack of memory; Stage 11 shows how to tell the two cases apart.
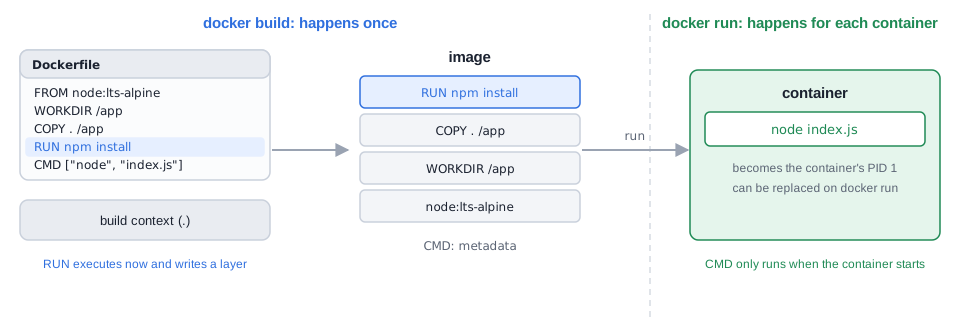
docker build executes RUN once and writes the result into a layer. CMD is stored as metadata and only runs when a container starts, as PID 1.Diagram: made for this guideKey concepts
Dockerfile
versionable recipe that turns manual decisions into a repeatable build.
FROM
every image starts from another; the choice of base determines size, compatibility and attack surface.
WORKDIR, COPY, RUN
prepare the image content during the build.
CMD
the main process of the container, executed at runtime.
EXPOSE
documentation only; what publishes the port is --publish (or ports in Compose).
Build context
the folder sent to Docker in docker build; only what is in it can be copied.
Build tag
--tag name:version names the built image.
PID 1 and --init
the main process does not get the default signal handling; the init passes SIGTERM and SIGINT on to the program.
Worked examples
Create server.js:
// Imports only the HTTP module included in Node.js.const http = require("node:http");// Reads the port from the environment and keeps 3000 as the local default.const port = Number(process.env.PORT || 3000);// Creates a simple JSON response for any request.const server = http.createServer((_request, response) => {response.writeHead(200, { "content-type": "application/json" });response.end(JSON.stringify({ status: "ok" }));});// Listens on all of the container's interfaces.server.listen(port, "0.0.0.0", () => {console.log(`Servidor disponível na porta ${port}`);});
Create Dockerfile:
Essential commands for this stage
CMD with another commandHands-on
- Create the two files from the example in an empty directory.
- Build
minha-api:1.0and run the container with--init, as in the example. - In another terminal, confirm the response with
curl http://localhost:3000and end the container withdocker stop minha-api(or Ctrl+C in its terminal). Confirm withdocker psthat port 3000 is free. - Change the response value to
{"status":"pronto"}. - Rebuild with the tag
minha-api:1.1. - Run
docker images minha-apiand note that the versions are distinct images. - Run
docker run --rm minha-api:1.1 node -e "console.log('outro comando')"and note that theCMDwas replaced without rebuilding anything.
Tip: Keep the Dockerfile in the same repository as the code. That way, the image recipe is versioned along with the application, and a new colleague can reproduce the environment with a single docker build.
Takeaway: A Dockerfile turns manual decisions into a repeatable, versionable build.
Stage 04 optimization
Layers, cache, minimal images and multistage build
The problem
A Dockerfile copies the whole project before installing dependencies. Any one-line change invalidates the cache and downloads everything again. The final image also carries compilers, caches and files used only in the build. The result is slow to build, costs more to transfer and offers a larger attack surface.
The concept
Docker stores the result of each instruction as a layer. If it finds a layer identical to one it has already built, it reuses it (it appears as CACHED in the build). This only happens while the instruction and its input files do not change, and, when a layer is invalidated, all the following ones are too. That is why dependency files should be copied before the rest of the code: first copy the minimum needed to install the dependencies, run the installation and only then copy the rest of the project.
The same logic applies to any package manager (npm, pip, yarn, pnpm, composer); only the file names change. Also use the mode that respects the lockfile (npm ci, --frozen-lockfile) for predictable builds.
A multistage build uses a tool-rich stage to build the artifact and a smaller final stage to run it. You open a FROM for the build, install dependencies and compile, and then open a new, clean FROM, copying only the result with COPY --from=. Build tools, development node_modules and temporary files do not go into the final image.
Common base image variants:
slim: reduced Debian base, with good compatibility. It is a middle ground between weight and convenience.alpine: minimal distribution (a few megabytes) that usesmuslinstead ofglibcand theapkpackage manager. Things that usually come by default are missing, such asbashandcurl; install them withapk addwhen you need them. It may require adjustments for native dependencies.distroless: contains only what is needed to run the application, with no shell, no package manager and no utilities. It is excellent for production from a security standpoint, but demands a very well made build and normally depends on multistage.
Smaller is not always better. For development, or while you do not yet know what you will need, start with a more complete image and "trim it down" after everything works. For production, when you already know exactly what runs, alpine or slim reduce the final size, the transfer time and the attack surface. The base must be compatible, up to date and sufficient to diagnose and run the application.
The multistage example below copies only /app/dist to the runtime. This only works when dist is self-sufficient or when the application uses only native Node modules. If the artifact imports packages from node_modules, the final stage also needs to receive the production dependencies, for example with its own npm ci --omit=dev installation. Multistage is no license to leave needed dependencies behind.
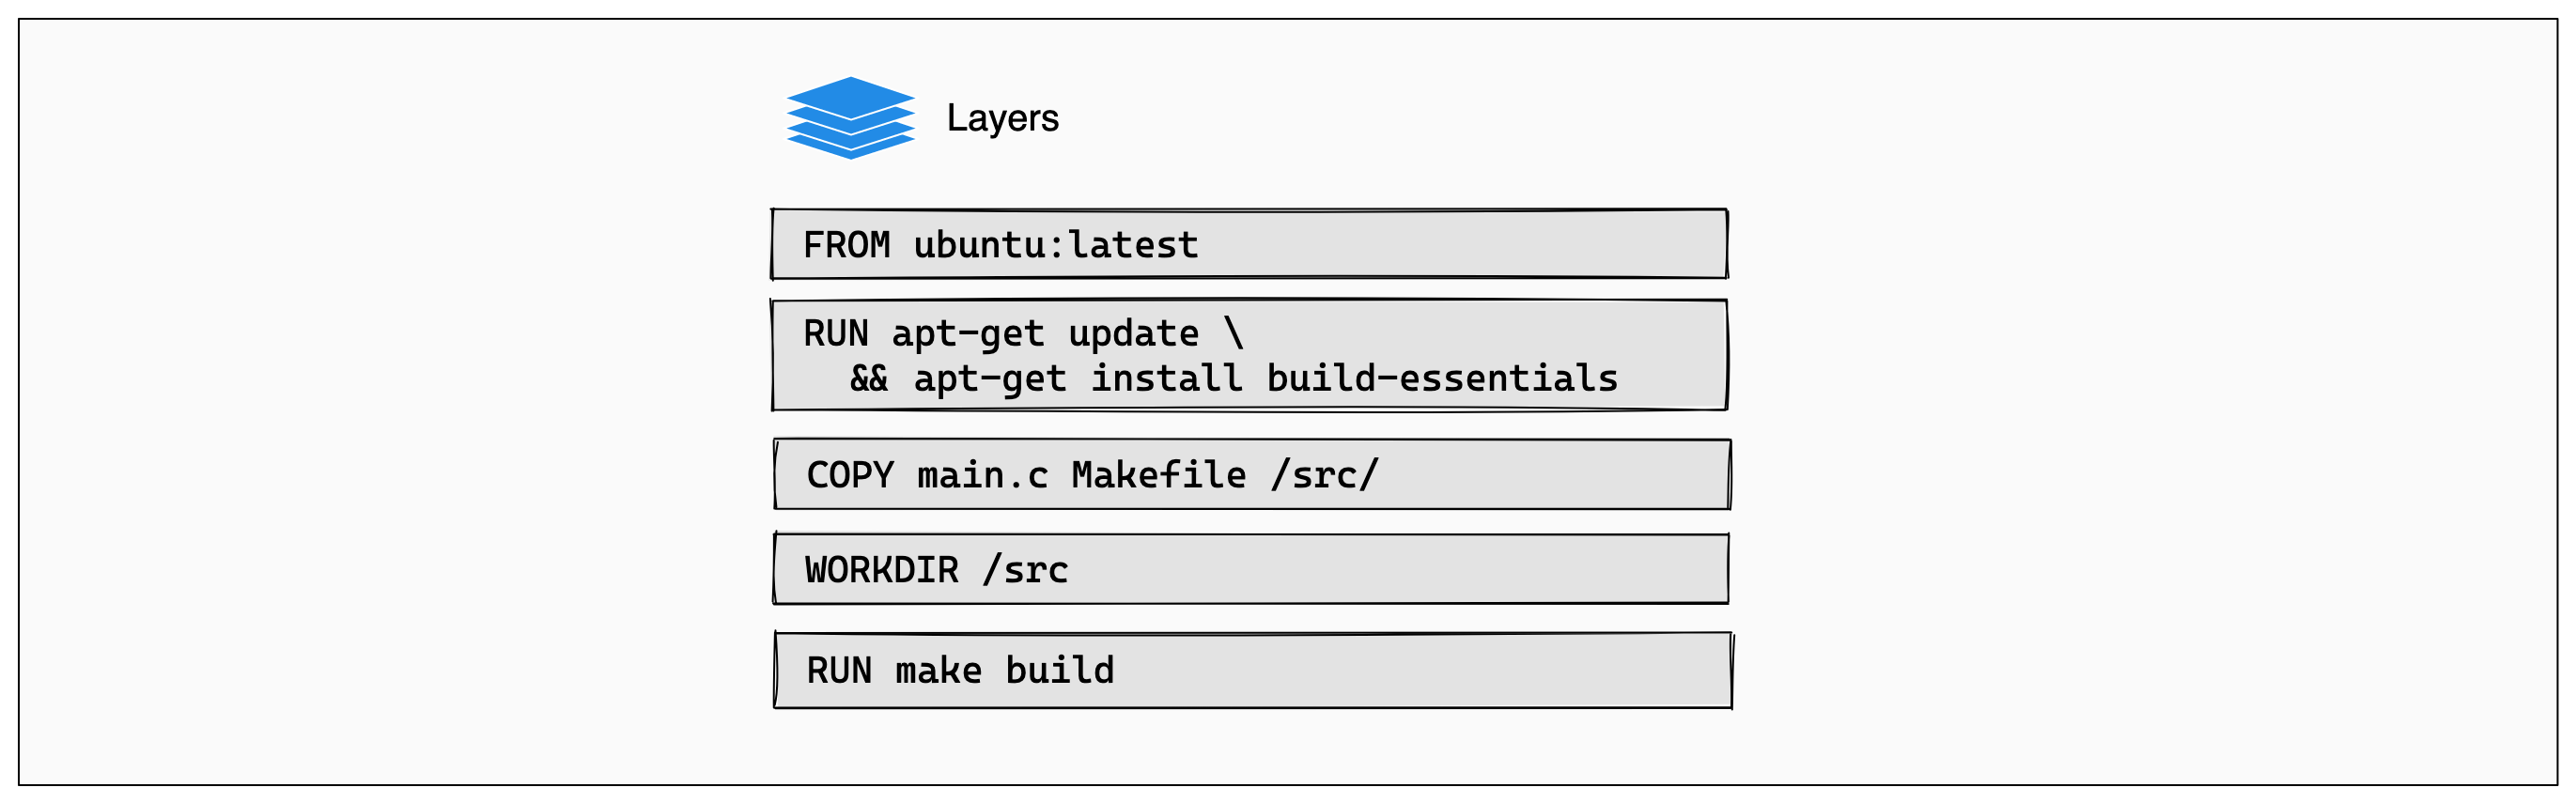
With no change to the files, each instruction reuses the layer already built.
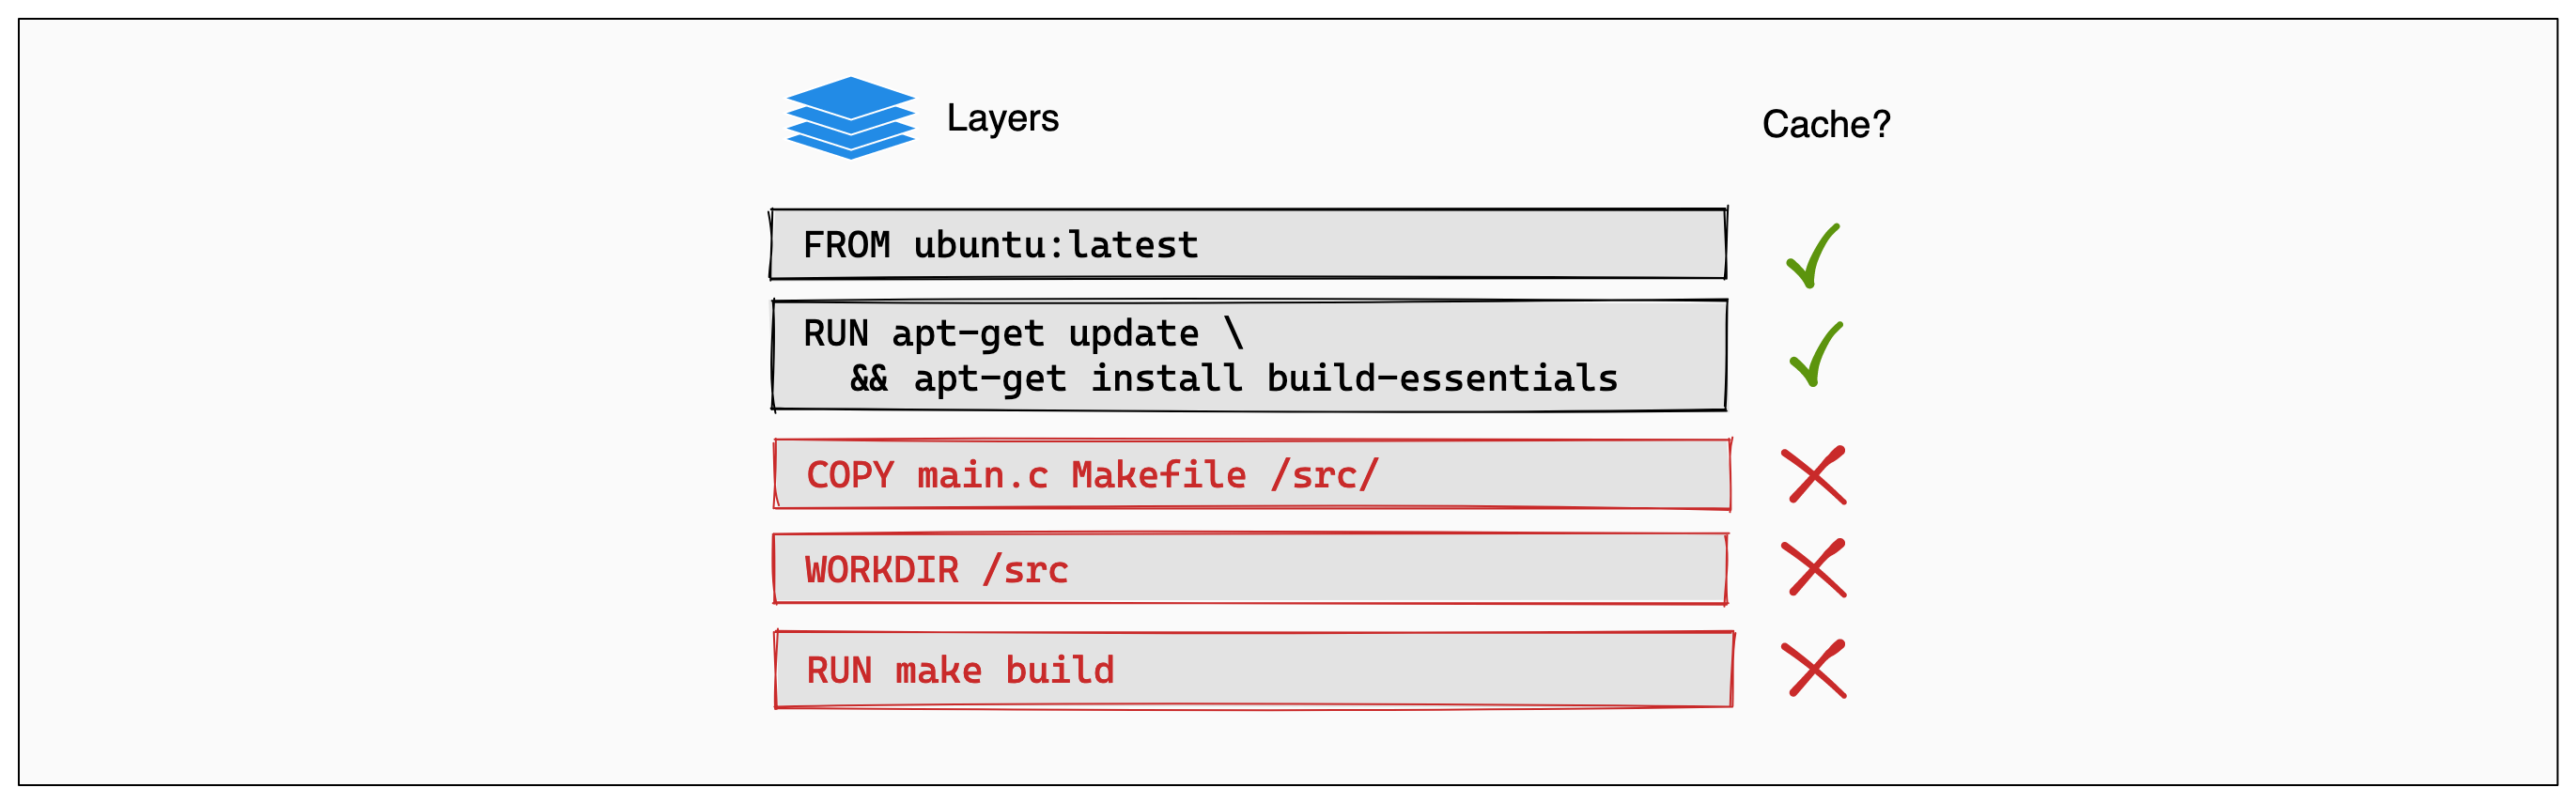
The copied files changed: COPY loses the cache, and so does every instruction after it. That is why what changes least comes first.
Key concepts
Layer
immutable result of an instruction; it is the unit of cache and of transfer.
Build cache
reuses layers that did not change; an invalidated layer invalidates the following ones.
Order by frequency of change
what changes little (dependencies) comes before what changes a lot (code).
Lockfile
package-lock.json and equivalents; with npm ci the installation follows exactly what is in it.
slim, alpine, distroless
three levels of slimming down, each with a cost in compatibility or diagnosis.
Multistage build
separates building from running; COPY --from=etapa brings only the artifact.
Worked examples
# WRONG: copying the whole project before installing.# Any change to any file invalidates the COPY, and npm ci runs again.FROM node:lts-alpineWORKDIR /appCOPY . .RUN npm ci
Essential commands for this stage
CACHEDbuild stage, to inspect itdocker stop in another terminalHands-on
- Create a folder with the
server.jsfrom Stage 03, thepackage.json, thepackage-lock.json, thebuild.jsand the multistage Dockerfile from this stage. - Confirm that the
package-lock.jsonis exactly the one provided above. It letsnpm cirun inside the build without requiring Node or npm on the host. - Run
docker build --tag minha-app:otimizada .twice. - On the second run, note
CACHEDon the steps that did not change. - Change only the response message in
server.jsand rebuild. - Confirm that the
npm cistep stayed cached and test withdocker run --rm --init --publish 3000:3000 minha-app:otimizada, followed bycurl http://localhost:3000in another terminal. To end it, use Ctrl+C in the container's terminal ordocker stopwith the ID shown bydocker ps, in another terminal. Since the container was created without--name, Docker picks a random name; look it up indocker ps. - Swap the order of the instructions to the "WRONG" format (a
COPY . .beforenpm ci), changeserver.jsagain and rebuild. Note that this timenpm ciruns again. Undo the swap. - Run the three commands from "feeling the difference between bases" and note what is absent on Alpine.
Tip: If a small image breaks in production because of a native library, the problem is usually the difference between musl (Alpine) and glibc (Debian). Before blaming the code, test the same application on slim. And remember that a distroless image has no shell: to diagnose, you will have to use other means (logs, a separate debug image).
Takeaway: Order layers by frequency of change and keep build tools out of the runtime image.
Stage 05 volumes + mounts
Persistence with volumes, bind mounts and tmpfs
The problem
A database writes data to the container's filesystem. During an update, the container is removed and recreated. The image is still available, but the data in the writable layer disappears along with the container.
The concept
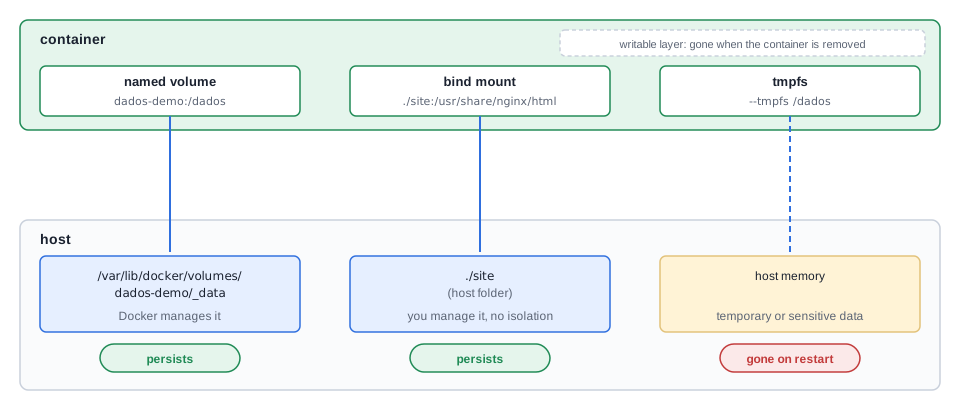
The container's writable layer is disposable by definition. Data that needs to survive the swap of the container must live somewhere else, connected to it. Docker offers three main mechanisms:
Named volume. It is the recommended form for production. Docker creates and registers the volume in its internal metadata and stores it, by default, on the host at a path such as /var/lib/docker/volumes/<name>/_data; what the container sees is that directory mounted at the path you defined (for example, /var/lib/mysql). Strengths: management through Docker commands, simpler backup and migration, isolation from the rest of the host. The physical path is an internal detail of the Engine and may vary by system and runtime, so prefer Docker commands over manipulating /var/lib/docker directly.
Bind mount. It points directly to a specific path on the host, which the container sees exactly as it is, with all files and permissions. It is great in development, because you edit the code on the host and the container sees the change in real time. On the other hand, there is no isolation (the container can alter the host's filesystem) and portability is limited, because it depends on the folder structure of that computer.
tmpfs. It stores data in the host's memory. When the container stops or restarts, everything is lost. It is suitable for temporary or sensitive data that, in general, should not be written to disk (under memory pressure, the system may move tmpfs pages to the swap area, so do not treat it as an absolute guarantee that nothing reaches the disk). tmpfs is a mount type, and not a persistent volume driver.
Volume drivers. The local driver is the default and uses the host's filesystem; it serves most cases well and is the recommended starting point. When several hosts need to access the same storage, the volume can use NFS through the local driver itself or a third-party plugin compatible with the provider (for example, integrations with EBS, Azure Disk or Ceph). In cloud environments with an orchestrator, specialized drivers or CSI plugins in Kubernetes are the common options. That choice depends on network, availability, permissions, backup and the consistency the application requires; only go down that road if there is a real need for sharing, remote persistence or specific performance requirements.
Key concepts
Writable layer
ephemeral; vanishes with the container.
Named volume
storage managed by Docker, independent of the container lifecycle.
Bind mount
a host path mounted inside the container; convenient, but coupled to the host.
tmpfs
in-memory mount, with no persistence.
local driver
persists on the host where Docker is running.
Remote volume (NFS or plugin)
allows sharing storage between hosts, with extra complexity.
:ro
suffix that mounts the path as read-only.
Worked examples
# Creates a volume managed by Docker.$ docker volume create dados-demo# Writes a file inside the volume and removes the container when it ends.$ docker run --rm \--volume dados-demo:/dados \alpine sh -c 'echo persistiu > /dados/mensagem.txt'# A new container reads the same volume.$ docker run --rm \--volume dados-demo:/dados:ro \alpine cat /dados/mensagem.txt# Shows the volume's metadata.$ docker volume inspect dados-demo# expected outputpersistiu
The :ro suffix mounts the volume as read-only in the second container.
Essential commands for this stage
local driver by default)-v name:/path): mounts a named volumeHands-on
- Run the commands from the first example (volume
dados-demo). - Confirm that the first container no longer exists with
docker ps --all. - Read the file using a second container.
- Prove that tmpfs does not survive a restart: run the tmpfs example (
docker run --detach --init --name tmp-demo --tmpfs /dados alpine sleep 300, write withdocker exec tmp-demo sh -c 'echo x > /dados/a', rundocker restart tmp-demoand list withdocker exec tmp-demo ls -A /dados). The listing should come out empty. Remove the container withdocker rm --force tmp-demo. - Run the bind mount example and confirm that the edit made on the host shows up in the response without restarting the container.
- Confirm that the volume contains only lab data. Then run
docker volume rm dados-demo. The removal is permanent and offers no trash bin or automatic recovery.
Tip: For any data that cannot be lost (database, uploads), use a named volume. Reserve the bind mount for the code you edit during development, and remember that a bind mount in production ties the application to the folder structure of that server.
Takeaway: If data needs to survive the container, it cannot depend on that container's writable layer.
Stage 06 connectivity
Networks, internal DNS and port publishing
The problem
An API needs to reach a database. Using the container's current IP works until it is recreated and gets another address. Publishing the database port on the host solves access, but exposes a service that should be internal.
The concept
Each container gets its own network namespace and its own IP inside a Docker network. When you create a custom network with docker network create, Docker enables an internal DNS on it: each connected container can be found by the name defined in --name. The API connects to the database using the hostname banco, with no fixed IP; a Node.js application would talk to a MongoDB just by pointing the URI to mongodb://mongo:27017, as long as the container is named mongo and both are on the same network.
Custom networks are also isolated by default: only containers connected to the same network see each other. This lets you isolate databases, separate environments (dev and prod) and reduce the attack surface. Containers can be connected to and disconnected from networks at any time, which gives fine control over who talks to whom. The same network logic is used by Docker Compose (Stage 07) and by orchestrators such as Kubernetes.
The network modes are:
bridge: isolated network on the same host, with an IP per container. User-created bridge networks offer automatic name resolution. It is the everyday mode, suited to local development and simple single-host environments.host: the container shares the host's network stack, with no NAT and no IP of its own. It gives more performance and direct access to the host's network (useful for monitoring and local proxies), but eliminates network isolation and can cause port conflicts.none: disables the container's network connectivity. Useful for tests and workloads that should not communicate with anything.overlay: connects containers on different hosts, used with Docker Swarm. Other advanced networks (such asmacvlan) exist for specific orchestration scenarios and are outside this guide.
The default bridge network (the one the container gets when you specify nothing) and a user-created bridge are not equivalent. DNS by container name is an advantage of the custom network. On the default bridge, do not depend on this automatic discovery.
Discovery by name is different from external access. EXPOSE 3000 documents a port in the image. --publish 8080:3000 creates the forwarding from port 8080 on the host to port 3000 in the container. For services that only other containers access (such as the database), publish nothing.
DNS does not transmit data or authenticate participants: it only resolves names to addresses. Isolation, encryption and authorization require their own mechanisms.
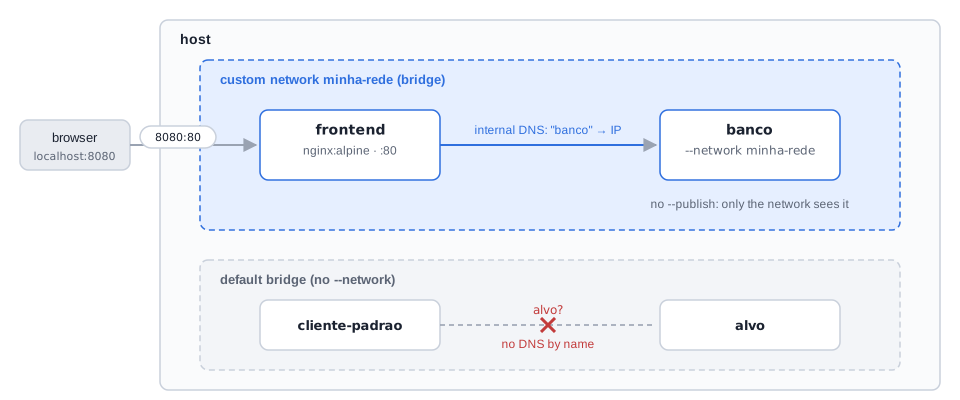
--publish receives traffic from outside. The default bridge has no name resolution.Diagram: made for this guideKey concepts
Custom bridge network
isolates a group of containers and offers DNS by name.
Internal DNS
translates the container name to its current IP.
host
no network isolation; only for specific cases.
none
no network at all.
overlay
network across hosts, belonging to the Swarm universe.
Port publishing (--publish)
opens access from the host to a container; without it, the service is only visible inside the network.
EXPOSE
documentation in the image, with no publishing effect.
docker network connect and disconnect
attach a container that is already running to a network, or detach it from it.
Worked examples
# Creates a bridge with internal DNS.$ docker network create rede-demo# Starts a server called web on that network.$ docker run --detach --name web --network rede-demo nginx:alpine# A temporary container resolves the hostname web and makes a request.$ docker run --rm --network rede-demo curlimages/curl \--silent --head http://web# Shows which containers are connected.$ docker network inspect rede-demo# Cleans up the exercise resources.$ docker rm --force web$ docker network rm rede-demo# expected outputHTTP/1.1 200 OKServer: nginx/...
No port was published. The communication happened internally, through the hostname web.
Essential commands for this stage
--driver bridge)-p): publishes a portdocker run --network none image: host and none modesHands-on
- Run the first example (
rede-demo) without the two cleanup commands at the end (docker rm --force webanddocker network rm rede-demo), because the next steps still need thewebcontainer and the network. Confirm the statusHTTP/1.1 200 OK. - Run
docker run --rm curlimages/curl --head http://web, without--network rede-demo. - Note the resolution failure, since the new container is outside the network. The expected output is
curl: (6) Could not resolve host: web. - Create a client with
docker run --detach --name cliente alpine sleep 300. - Connect it with
docker network connect rede-demo cliente. - Prove discovery by name with
docker exec cliente wget -qO- http://web. The output should contain Nginx's welcome HTML (<title>Welcome to nginx!</title>). - Inspect the connections with
docker network inspect rede-demoand locatewebandclientein the list of containers. - Disconnect the client with
docker network disconnect rede-demo cliente, repeat thewgetand note that resolution fails again, withwget: bad address 'web'. - Check the names and remove the lab containers with
docker rm --force cliente web; then remove the network withdocker network rm rede-demo.--forceends the containers without the normal shutdown and is only appropriate here because both are disposable. - Run the example "the default bridge does not resolve names" and compare the error (
wget: bad address 'alvo') with the success in step 6.
Tip: To expose a service only to your own computer (for example, while developing), publish on the loopback address: --publish 127.0.0.1:8080:80. That way the port is not reachable from other machines on the network.
Takeaway: Containers on the same custom network find each other by name; publish only the ports that need to be reached from the host.
Stage 07 multi-container
Docker Compose for multi-container applications
The problem
Starting API, database, network and volume with several commands works until someone forgets a flag, uses a different name or runs the steps in the wrong order. The environment stops being a versionable configuration and becomes an oral sequence of instructions.
The concept
Docker Compose describes a whole application in a single YAML file (by default compose.yaml; the older name docker-compose.yml is still accepted). With one command you start, observe and tear down all the containers, networks and volumes. Compose automatically creates a network for the project, and the services find each other by service name (db, web), with the same DNS logic as Stage 06. The project name is, by default, the name of the folder, and the containers get names such as projeto-web-1.
The main elements of the file are:
services: the containers that make up the application.buildorimage: how to obtain the image for each service.ports: ports published on the host.volumes: persistence or file sharing.networks: communication boundaries.environmentandenv_file: non-secret configuration.secrets: files mounted for sensitive data (Stage 10).init:init: trueruns an init as the service's PID 1, equivalent to--initofdocker run(Stage 03).
Instead of image:, a service can use a build: block to be built locally before starting. Three fields give control over this: context (the folder used as the base of the build), dockerfile (which file to use, useful for Dockerfile.dev and Dockerfile.prod) and args (build parameters declared with ARG in the Dockerfile). This avoids piling up nearly identical Dockerfiles and lets anyone clone the repository and run docker compose up with builds adapted to the team's workflow.
Compose does not solve everything on its own. It interprets the definition and coordinates Docker resources, but the application still needs to handle startup, transient failures and dependencies correctly. depends_on guarantees creation order, not that the database is ready; readiness is handled with healthchecks in Stages 08 and 12.
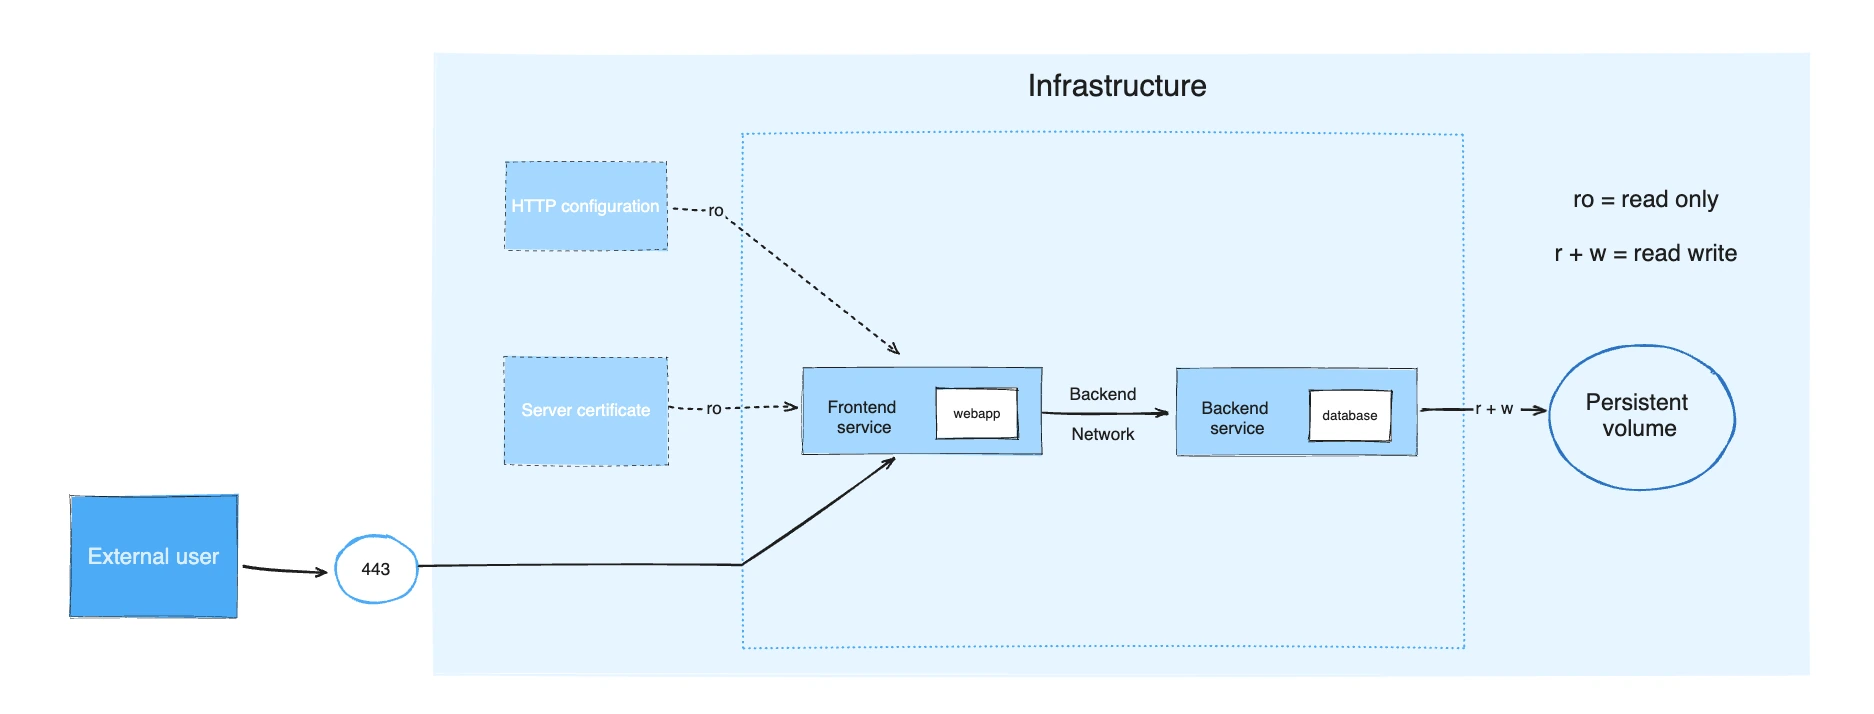
Key concepts
Compose file
versionable description of services, networks and volumes.
Service
a container (or a group of replicas) defined in the file.
Project network
created automatically; the service name works as a hostname.
build (context, dockerfile, args)
builds the service's image locally.
depends_on
creation order, and not readiness.
init: true
puts an init as PID 1, so that docker compose down ends the Node service without waiting for the deadline.
Declared volume
the file's volumes: block creates the named volume used by the services.
docker compose config
shows the consolidated configuration and reports YAML errors.
Worked examples
services:web:# Builds using the Dockerfile in the current directory.build:context: .dockerfile: Dockerfile# Runs an init as PID 1, so that Node receives SIGTERM and the down is quick.init: true# Publishes only the service that receives external traffic.ports:- "3000:3000"# The hostname db will be resolved by the Compose network's DNS.environment:DB_HOST: db# Expresses the creation dependency, not the database's readiness.depends_on:- dbdb:# Pins the major version of the official image.image: postgres:16-alpineenvironment:POSTGRES_PASSWORD: exemplo-local# Persists the data outside the container lifecycle.volumes:- dados_db:/var/lib/postgresql/data# Declares the named volume used by the database.volumes:dados_db:
Commands:
Essential commands for this stage
docker compose logs db)docker compose start service: stop and resume a serviceHands-on
- Save the example as
compose.yamlnext to theDockerfileand theserver.jsfrom Stage 03. - Run
docker compose configbefore starting. This command shows the consolidated configuration and detects YAML errors. - Run
docker compose up --detach --build. - Check
docker compose psanddocker compose logs db. - From inside the
webservice, confirm discovery of the database by name withdocker compose exec web nslookup db. The output should show the namedband an internal IP address. - Finish with
docker compose down. Do not use--volumesif you want to preserve the data. Then rundocker volume lsand note that the database volume is still there, named<folder>_dados_db.
Tip: Run docker compose config whenever you edit the YAML, before up. It catches indentation errors and shows the final values (expanded variables, combined files), which saves a lot of trial and error.
Takeaway: Compose turns a fragile sequence of commands into a versionable definition of the application.
Stage 08 operations
Environments, restart, scaling and CI
The problem
Development needs a bind mount and detailed logs. Production needs a ready-made image and less exposure. Copying the whole Compose file for each environment creates nearly identical files that drift apart over time. Besides that, a process can fail temporarily and not come back on its own, and a test pipeline needs a disposable environment that resembles the real one.
The concept
Multiple Compose files. Compose combines files in the order given by -f, and later ones override earlier ones, as long as the services keep the same name. A production file can replace only the image, ports or variables needed, without duplicating the base YAML:
docker compose \-f compose.yaml \-f compose.prod.yaml \config
Use config to check the result before starting. By default, docker compose up (without -f) automatically loads compose.yaml and, if it exists, compose.override.yaml (in the old names, docker-compose.yml and docker-compose.override.yml). This makes the override the natural place for development adjustments. When using -f explicitly, only the listed files are loaded.
Restart policies:
no(default): does not restart automatically.on-failure: restarts when the process ends with a non-zero code; accepts a limit on attempts (on-failure:3).always: tries to keep the container active, whatever the reason for the stop.unless-stopped: similar toalways, but respects a manual stop.
Do not put always on everything: understand the role of each service. A database usually does fine with unless-stopped; an API that depends on the database can use on-failure with a limit, to avoid infinite loops when the error is in the configuration; a queue consumer that must always be active can use always. A restart policy does not solve startup order nor guarantee that a dependency is ready. For readiness, combine healthcheck and conditional dependencies (depends_on with condition: service_healthy) when your Compose version supports it, and keep retries in the application itself.
Scaling. docker compose up --scale worker=3 creates replicas of a service. Each replica is an independent instance, and a fixed port mapping such as 8080:3000 prevents several replicas on the same host, because port 8080 can only be occupied once. Replicas behind a single port require a load balancer in front of them.
CI (continuous integration). The same definition that runs on the developer's machine can be used in a pipeline: start the dependencies (for example, a Node.js application and a Postgres database), run the integration tests and remove everything. This brings consistency between the local environment and the build pipeline, avoids depending on external services or mocks for everything and brings the test environment closer to production. Compose works on practically any CI provider (GitHub Actions, GitLab CI, Bitbucket, Jenkins).
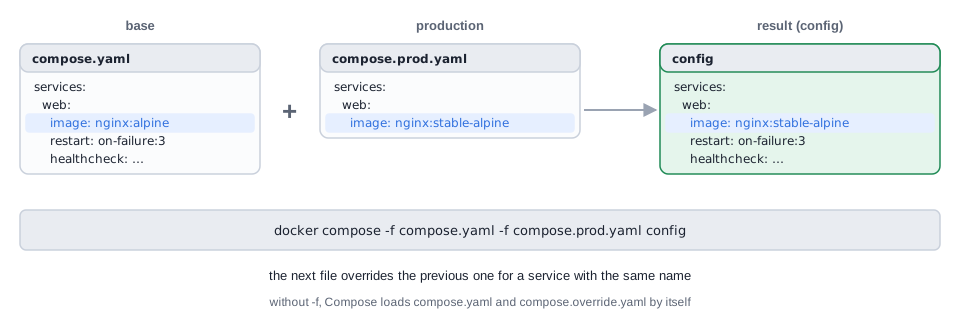
-f, the next file overrides the previous one for a service with the same name: only the image changes, and the rest comes from the base file. Always check with config.Diagram: made for this guideKey concepts
Override
file that changes only what varies between environments.
Multiple -f
explicitly defines which files to combine and in what order.
restart
reaction to process shutdowns; does not replace a readiness check.
on-failure:N
restarts at most N times after failures.
--scale
creates replicas; a fixed port on the host limits it to one replica.
--wait
makes up wait until the services with a healthcheck become healthy.
CI with Compose
disposable environment, start, test and tear down.
Worked examples
compose.yaml:
services:web:# Uses a public image so that the example runs without an external project.image: nginx:alpine# Restarts only on process failure, up to three times.restart: on-failure:3labels:ambiente: desenvolvimentohealthcheck:# wget already exists in this variant of the image.test: ["CMD", "wget", "--quiet", "--spider", "http://localhost"]interval: 5stimeout: 2sretries: 5
compose.prod.yaml:
Essential commands for this stage
Hands-on
- Create an empty folder and save in it the two YAML files from the "base and production" example. No Dockerfile or additional code is needed.
- Compare
docker compose -f compose.yaml configwithdocker compose -f compose.yaml -f compose.prod.yaml config. - Note the image tag and the value of the
ambientelabel in the consolidated result: in the first commandnginx:alpineanddesenvolvimentoappear; in the second,nginx:stable-alpineandproducao. - Run
docker compose -f compose.yaml -f compose.prod.yaml up --detach --wait. - Confirm
healthywithdocker compose -f compose.yaml -f compose.prod.yaml ps. The status column should end in(healthy). - Validate Nginx with
docker compose -f compose.yaml -f compose.prod.yaml exec web nginx -t. The output should end intest is successful. End withdocker compose -f compose.yaml -f compose.prod.yaml down. - In another folder, run the restart and scaling example. Confirm three
workerreplicas indocker compose psand thereinicios=3offalhador. End withdocker compose down. - Still in that folder, add
ports: ["8080:80"]to theworkerservice and rundocker compose up --detach --scale worker=2. Note the port conflict: one of the replicas does not start and Docker reportsBind for 0.0.0.0:8080 failed: port is already allocated. Finish withdocker compose downto free the folder and the port.
Tip: Always start with docker compose config when combining files. Seeing the consolidated result before starting avoids the surprise of an override that did not overwrite what you expected (or of a -f that switched off the automatic override).
Takeaway: Additional Compose files change only what varies between environments; restart recovers processes, but does not replace a readiness check.
Stage 09 least privilege
Layered security
The problem
A vulnerable application runs as root, gets more capabilities than it needs and carries a token inside the image. If it is exploited, the attacker finds permissions and data that were never needed for the service's task.
The concept
Since the container shares the kernel with the host, trusting the default isolation is not enough: a container escape can give access to the system. The defense comes from combining several layers, each one reducing what an exploit could do:
- Namespaces isolate the view of resources (Stage 01).
- Capabilities split the traditional privileges of root into smaller permissions. By default, the container's root already has fewer powers than the host's root. You remove dangerous capabilities (such as
NET_ADMINandSYS_ADMIN) with--cap-dropand grant a specific one with--cap-addonly if the service proves it needs it. The rule is least privilege. - Seccomp works as a filter of system calls (syscalls). Linux has hundreds of them, and seccomp lets you block several, based on an allow list. Docker already ships a default profile that blocks dangerous calls, and it is possible to supply your own, more restrictive profile with
--security-opt seccomp=profile.json. - AppArmor or SELinux, when enabled on the host, add mandatory access control.
- Non-root user reduces the impact of an exploit. By default, the container runs as root; create an unprivileged user in the image and use
USER. - Minimal permissions avoid
chmod 777as a generic solution: understand who should own what and grant the minimum necessary. - Read-only filesystem (
--read-only), withtmpfsonly where the application needs to write, prevents an attacker from altering the running image. - Small, up-to-date image reduces the tools and vulnerabilities available.
- Secrets in their own files keep sensitive values out of the Dockerfile and the environment (Stage 10).
The root user inside a container is not automatically identical to the host's root, since namespaces and capabilities impose limits. Even so, running as UID 0 without need increases risk, especially with dangerous mounts, extra capabilities or runtime flaws.
When creating the user in the image, use adduser (or useradd, depending on the base distribution) and set the owner of the copied files with --chown. When using volumes or bind mounts, the host user may differ from the container user, which causes permission problems; the common solution is to run the container with the same UID and GID as the host (--user "$(id -u):$(id -g)").
Namespaces are not unbreakable walls and USER node does not solve security on its own. The defense comes from the combination of controls, and the real implementation belongs to the kernel, the runtime, the image and the run options. Do not mount /var/run/docker.sock in ordinary applications: whoever controls that socket can control the Docker Engine and, in practice, compromise the host.
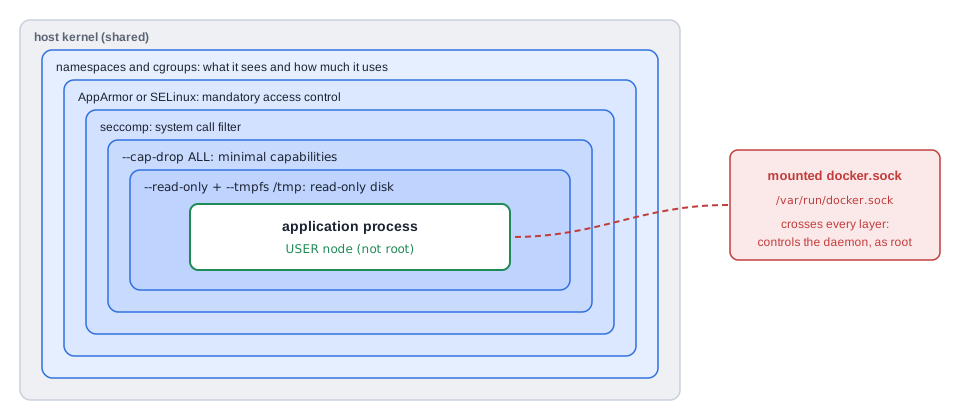
docker.sock cancels all of them, because it gives control of the daemon, which runs as root on the host.Diagram: made for this guideKey concepts
Defense in depth
several layers, none sufficient alone.
Non-root user (USER)
the process runs without administrative privileges.
--chown
sets the owner of the files copied into the image.
--cap-drop ALL and --cap-add
removes all capabilities and gives back only the indispensable ones.
Seccomp
system call filter; there is a default Docker profile.
--read-only and --tmpfs
immutable root with writable, ephemeral areas only where needed.
--user uid:gid
makes the container use the same IDs as the host, avoiding permission problems on mounts.
docker.sock
access to it is equivalent to control over Docker; do not mount it in ordinary applications.
Worked examples
# Template for a Node.js application on Alpine.FROM node:lts-alpine# Creates an unprivileged user; -D skips the password (Alpine command).# On Debian bases the equivalent is: RUN useradd -m appuserRUN adduser -D appuserWORKDIR /app# Copies the files already owned by the application user.COPY --chown=appuser:appuser . .# Installs dependencies per the lockfile, still with build privilege.RUN npm ci --omit=dev# The following instructions and the main process run without privileges.USER appuserCMD ["npm", "start"]
This template guarantees that there is a user without root privileges, that the files were copied with the correct permission and that the whole application runs with limited permissions. In an official Node image, the node user already exists, and it is enough to use COPY --chown=node:node and USER node. A minimal, runnable version to see the effect:
Essential commands for this stage
/tmp writable in memoryHands-on
- Run
docker run --rm node:lts-alpine idand note the image's default user (uid=0(root)). - Run
docker run --rm --user node node:lts-alpine idand confirmuid=1000(node). - Prove
--read-onlyas root: rundocker run --rm alpine sh -c 'touch /liberado && echo "escrita permitida"'and thendocker run --rm --read-only alpine touch /bloqueado. The output of the second should betouch: /bloqueado: Read-only file system. - Run the full command from the runtime example with
--read-onlyand--tmpfs /tmp, and confirm the two expected messages:raiz bloqueadaandtmpfs gravável. - Remove
--tmpfs /tmpfrom the combined command and repeat. Writing to/tmpalso fails, because it goes back to being part of the read-only root. The expected output israiz bloqueada, followed bysh: can't create /tmp/teste: Read-only file systemandcat: can't open '/tmp/teste': No such file or directory. - Run the two commands from the capabilities example and compare the result.
- Build and run
usuario-demoand confirm thatidshowsappuser, and notroot. - Run the UID and GID example and confirm that the owners of the two files are different and that editing root's file from the host is denied (
Permission denied).
Tip: When an application fails after --cap-drop ALL, do not go back out of reflex. Read the error, identify which operation was denied and give back only the corresponding capability with --cap-add. That is how the minimum set is discovered.
Takeaway: Container security is defense in depth: user, permissions, capabilities, system calls, image and mounts must cooperate.
Stage 10 supply chain
Build context, secrets and image analysis
The problem
A docker build . sends .git, node_modules, logs and .env into the context. The build is slow, the cache invalidates needlessly and a secret may end up copied into a layer. Even when deleted in a later instruction, it may remain in the history of an earlier layer. At another point in the cycle, a password placed in environment or in a .env shows up in inspection commands and may end up in Git.
The concept
The build context is everything in the folder given to docker build (or in the path you pass). By default, Docker tries to send everything, including .git, node_modules, large files and secrets. The `.dockerignore` works like a .gitignore for the build: it lists what should not be sent to the context. The result is a faster build, a smaller and safer image, and fewer cache invalidations. Keep the .dockerignore at the root of the project, near the Dockerfile, and run docker build as close as possible to the Dockerfile. If the build seems too heavy, check what is in the context: it is common to send gigabytes without noticing.
Consider the project:
meu-app/├── node_modules/├── .env├── .git/├── build/├── src/├── Dockerfile└── compose.yaml
A suitable .dockerignore:
# Local dependencies will be installed inside the image.node_modules# Local configuration and possible secrets do not enter the context..env.env.*# History, metadata and temporary files are unnecessary..git*.logcoveragedistbuild
This avoids sending thousands of node_modules files, prevents the .env from ending up inside the image, avoids copying the history of the .git folder and prevents artifacts from earlier builds from getting in by mistake. Each stack has different needs, so review any .dockerignore suggested by tools or code assistants for your own reality.
Environment variables and secrets. env_file is handy for local configuration, but does not turn values into secrets. They can appear in the container's configuration and inspection (docker inspect). .env files with credentials must not be versioned. The Compose secrets: directive mounts the value as a file inside the container, at /run/secrets/<name>, which avoids leaving it in the process environment. In local development, env_file remains handy; when the application gets staging or production, move the critical data to secrets.
Build parameters. ARG declares a value available during the build, and build.args supplies that value through Compose. They are for non-confidential data, such as version, distribution channel or feature selection. Do not use ARG for a password or token: build values can appear in the history, in metadata and in pipeline records.
Image analysis tools. Once you are past writing a lean Dockerfile, it is worth inspecting the image for real:
- Dive shows the content and weight of each layer: what each
RUN,COPYandADDadded, what is weighing it down and what can go. - Snyk checks for known vulnerabilities in the image and in dependencies, using a continuously maintained vulnerability database. It works from the command line and integrates with CI pipelines.
One complements the other: Dive helps understand the size, and Snyk takes care of security.
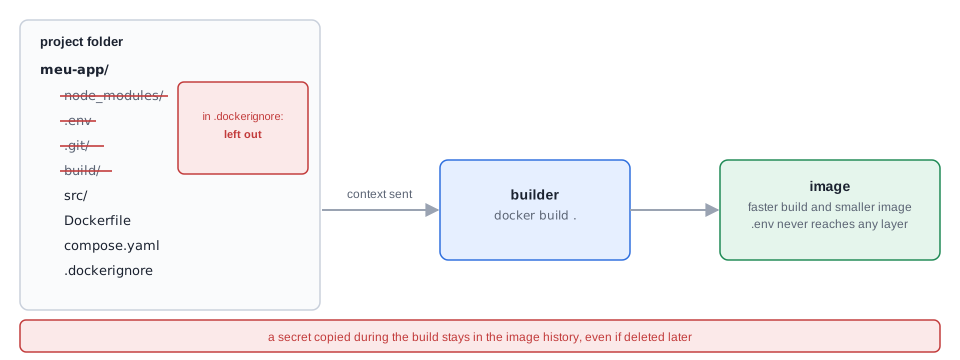
.dockerignore decides what never reaches the builder: the build gets faster and .env gets into no layer. A secret copied during the build stays in the history, even if deleted in a later instruction.Diagram: made for this guideKey concepts
Build context
what is sent to Docker in the build; everything in it can affect time, cache and exposure.
.dockerignore
filters the context before it is sent.
Secret in a layer
a secret copied into a layer stays in the history, even if it is deleted later.
env_file
convenient, but does not protect values.
secrets (Compose)
mounts the value as a file at /run/secrets/<name>.
ARG / build.args
non-confidential build parameters.
Dive and Snyk
analysis of layers and of vulnerabilities.
Worked examples
Use a folder with this Dockerfile and the compose.yaml right below.
# Uses a concrete base before declaring the stage's argument.FROM node:lts-alpine# Declares a non-confidential parameter with a default value.ARG APP_VERSION=dev# Records the version as metadata that can be queried in the image.LABEL org.opencontainers.image.version=$APP_VERSION
Essential commands for this stage
env_file; useful to notice what is exposedHands-on
- Go into the Stage 04 folder and create the weight on purpose:
mkdir -p node_modules && head -c 50000000 /dev/urandom > node_modules/pesado.bin. - Run
docker build --progress plain --tag minha-app:analise .only once and note the context size (about 50 MB). - Create the example's
.dockerignorein the same folder, repeat the build and compare the size sent (a few kB) and the cache reuse. - Use
docker history minha-app:analiseto identify instructions that added more data. Remove the artificial weight withrm -rf node_modules. - Reproduce the example "a secret that survives in the history": confirm in
docker historytheCOPYline with 21B (or a slightly larger, rounded value, if Docker uses the containerd image store) and theRUN rmone with 0B, and run thedocker savescript to seesenha-de-laboratorioappear in plain text. - Reproduce the
ARGexample withimage: versao-demoand confirm thatdocker inspectprints1.4.0. - If Dive or Snyk is installed, analyze the same tag and record one point for improvement.
Tip: BuildKit also lets you deliver secrets to the build without writing them to any layer. If a build step really needs a credential (for example, downloading a private package), consult Docker's documentation on build secrets instead of resorting to ARG or COPY.
Takeaway: A secret that does not enter the context cannot leak through a layer created during the build.
Stage 11 diagnostics
Troubleshooting with an investigation order
The problem
A container goes into Exited (1). Restarting it repeatedly does not explain the cause. Changing several settings at once can hide the symptom and create other problems.
The concept
Use a predictable sequence, from the cheapest evidence to the most specific:
- State:
docker ps --allshows whether the container is running, ended or restarting. - Logs:
docker logsshows the process's stdout and stderr. - Configuration:
docker inspectreveals command, mounts, network, ports and state. - Events:
docker eventsshows creation, start, stop, kill and removal in real time. - Process and resources:
docker topanddocker statsshow processes and consumption. - Internal test:
docker execruns a check inside a container that is still active.
docker inspect returns detailed JSON and is the source of answers to questions such as: which original command is being run (Config.Cmd), which volumes are mounted and where (Mounts), which ports are exposed and mapped (NetworkSettings.Ports), what the image is (Image) and whether the container is stopped by an error or restarting (State). To find out whether the container died from lack of memory, check State.OOMKilled. The --format option extracts exactly the desired field, and the full output can be combined with tools such as jq or used in shell scripts.
The exit code tells part of the story: 0 indicates normal termination; any other value comes from the program itself or from Docker. Known values include 125 (Docker failed to run the docker run), 126 (the command exists but could not be invoked), 127 (the command was not found) and 137 (the process received SIGKILL). 137 has more than one origin: it can be lack of memory (in which case OOMKilled appears as true), but it also appears when a docker stop times out without the process answering SIGTERM and Docker sends SIGKILL (in which case OOMKilled remains false; this is the effect of PID 1 without a signal handler described in Stage 03). Always confirm with OOMKilled before concluding that memory ran out.
docker events is lightweight and native, and follows state changes of containers, images, volumes and networks, with timestamps. It is especially useful in real-time troubleshooting, when testing automation scripts or during deploys. It can be filtered by type (--filter type=container) or by container (--filter container=name) and the output can feed scripts or a logging system.
docker restart without evidence switches the system off and on without reading what it said: it may bring the service back for a few minutes, but it also wipes the operational context and does not identify the cause. The order above protects the diagnosis from guesswork: inspection comes before any restart.
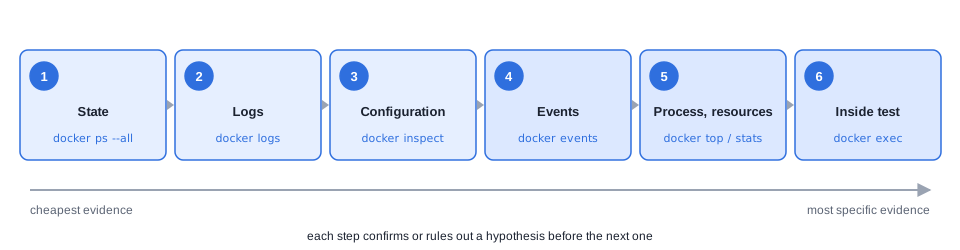
Key concepts
State and exit code
the first data to look at, before logs.
Logs
the message the process itself left behind.
docker inspect --format
extracts a specific field from the metadata.
OOMKilled
indicates that the container was killed for lack of memory.
Code 137
SIGKILL; it can be lack of memory (OOMKilled=true) or a docker stop that timed out (OOMKilled=false).
docker events
timeline of everything Docker did.
docker top and docker stats
processes and consumption in real time.
Hypothesis before evidence
formulate what you expect to find and confirm it.
Worked examples
# The shell records an error message and ends with code 42.$ docker run --name falha alpine \sh -c 'echo "configuração ausente" >&2; exit 42'# Confirms the exit code without reading all the JSON.$ docker inspect --format \'status={{.State.Status}} exit={{.State.ExitCode}} oom={{.State.OOMKilled}}' \falha# Retrieves the message emitted by the process.$ docker logs falha# expected outputconfiguração ausentestatus=exited exit=42 oom=falseconfiguração ausente
The message configuração ausente appears twice: the first is the stderr of docker run itself, shown in the terminal while the container was running; the second is the same message retrieved afterwards by docker logs, which reads what was recorded. The container keeps existing (stopped) until you remove it, and the removal is left for the end of the diagnosis:
Essential commands for this stage
docker logs --tail 50 name shows only the endrunning, exited, ...)docker events --filter type=container and docker events --filter container=name restrict the output--no-stream makes a single reading)Hands-on
- Cause the failure by running only the first command of the example (the
docker run --name falha ...), without thedocker rm: the removal is left for step 5. The messageconfiguração ausentealready appears in the terminal during this command. - Before looking at the logs, formulate a hypothesis using only state and exit code: run the example's
docker inspect --formatand readstatus=exited exit=42 oom=false. - Check the hypothesis with
docker logs falha. The same message appears a second time, now coming from Docker's record. - Use
docker inspect --format '{{json .Config.Cmd}}' falhato see the original command. - Remove the container only after recording the cause:
docker rm falha. - Run
docker run --rm alpine comando-inexistente, read the error and check the code withecho $?. The expected output is127. - With
docker events --filter type=containeropen in one terminal, rundocker run --rm --name evento alpine truein another and identify each event (create,attach,start,die,destroy).
Tip: Write your hypothesis before looking at each piece of evidence, even if in one line. This trains you to read the state and the exit code carefully, instead of running commands until something looks right.
Takeaway: Diagnosis starts from the observable state and moves on to evidence; restarting is not investigating.
Stage 12 observability
Logs, healthcheck and operational readiness
The problem
The process is active, so the container appears as Up. Even so, the application cannot serve requests because it lost access to a dependency. In another incident, the container was recreated and its local logs disappeared.
The concept
A healthcheck periodically runs a check and classifies the container as starting, healthy or unhealthy. The process state indicates presence; the healthcheck verifies the ability to serve. It does not fix the application on its own: the policy of the runtime or the orchestrator decides how to react. A good healthcheck also works as an alert for instability.
A healthy result has limited reach. It proves only the condition examined by the test at that moment. A shallow endpoint can pass the test while an important function is broken; a test that is too heavy can create load and false alarms. The healthcheck must represent the right function at a controlled cost.
The main parameters are test (the command), interval (how often), timeout (how long to wait for one attempt), retries (how many consecutive failures mark unhealthy) and start_period (an initial period in which failures do not count, so the application has time to come up). It can be declared in the Dockerfile (HEALTHCHECK instruction), in Compose (healthcheck:) or in docker run (--health-cmd and related options).
Logs. Applications should write logs to stdout and stderr, which is what docker logs reads. But relying only on docker logs stops being enough with multiple instances: logs are fragmented across containers and, if the container is destroyed, they are generally lost. The solution is to centralize and structure. Structured logs are records in a standardized format (usually JSON), with consistent fields such as timestamp, level, message and service, which makes searching and correlating events easier. In larger environments:
- Promtail is an agent that runs alongside the containers, reads the local logs and sends them to Loki. (It is Loki's historical agent, and Grafana has started pointing to another collector; check Grafana's documentation for which collection agent it recommends.)
- Loki stores and queries logs efficiently, with a model similar to Prometheus, only for logs.
- Fluentd can collect, transform and route events, and is useful in more complex scenarios, where logs need to be enriched before being sent.
- Grafana queries and visualizes the data, builds dashboards and correlates logs with metrics.
To get started, it is worth putting together a simple Compose setup that includes the collector, Loki and Grafana. Combining structured logs with alerts on critical events raises the application's observability.
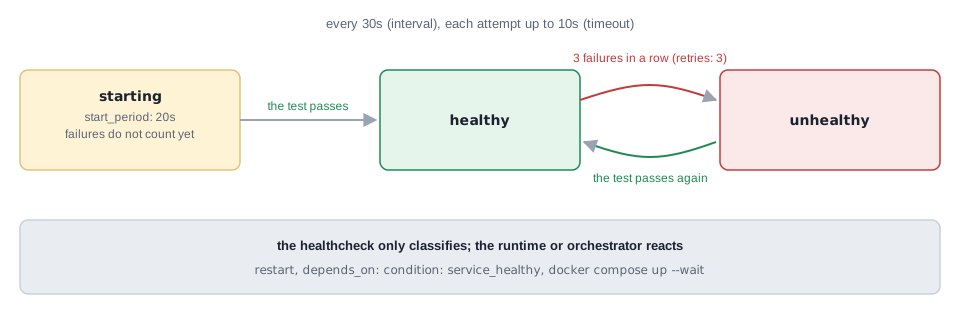
Key concepts
Healthcheck
periodic check of the ability to serve, and not of the presence of the process.
starting, healthy, unhealthy
the three health states.
start_period
initial tolerance for the application to come up.
stdout and stderr
where the application should write its logs.
Structured log (JSON)
fixed fields that allow searching and correlating.
Centralization
collector, storage and visualization (Promtail/Fluentd, Loki, Grafana).
Worked examples
services:api:image: minha-api:1.0healthcheck:# Runs a request with a tool present in the image.test: ["CMD", "curl", "--fail", "http://localhost:3000/health"]# Checks every 30 seconds.interval: 30s# Interrupts an attempt that goes over 10 seconds.timeout: 10s# Marks unhealthy after three consecutive failures.retries: 3# Gives the application time to start before counting failures.start_period: 20s
Make sure curl exists in the image. In minimal images, prefer a check done by the application's own runtime or deliberately include the necessary tool. Expected output in docker compose ps:
Essential commands for this stage
STATUS column shows (healthy), (unhealthy) or (health: starting)docker run--follow, --since 5m, --timestamps: useful variations of docker logsHands-on
- Run the sensor example and watch the sequence
starting,unhealthyandhealthy. - Build the
minha-api:saudeimage, start the container and follow theSTATUSindocker psuntil(healthy)appears. - Run
docker logs --tail 5 --timestamps api-saudeand note the time of each line. Then remove the container withdocker rm --force api-saude. The exercises of losing the real dependency of an API and watching the healthcheck react are in Stage 13, after you have the complete stack to test.
Tip: Choose what the healthcheck tests according to what really breaks. A test that only checks whether the port opens can pass with the database down; one that queries the database every second can become the biggest source of load. Prefer a light check that still depends on what is essential.
Takeaway: An active process answers the question "is it running?"; the healthcheck answers "can it do its job?".
Stage 13 defensive stack
Capstone, a small defensive stack
The problem
The isolated concepts work in the exercises, but production requires them to cooperate. The image must be reproducible, the process must run without root, the API must locate the database by name, the database must persist data, the password must not become an exposed variable and the environment must say when each service is healthy.
The concept
This final project combines only mechanisms already presented: Dockerfile, multistage build, non-root user, custom network, volume, tmpfs, secret in a file, healthcheck, dependency on health, reduced privileges, logs and Compose. No isolated mechanism delivers a reliable application; the result comes from the discipline of the whole.
The API uses only native Node modules. It tests whether it can open a TCP connection to PostgreSQL. This proves DNS discovery and connectivity without adding a database library to the exercise.
Compose also applies simple CPU and memory limits. They contain the maximum consumption of the lab, but do not guarantee performance nor reserve exclusive capacity. Labels add metadata for inventory, automation and observability; they describe the services without altering their behavior.
The api service uses init: true: as Stage 03 explained, Node as PID 1 ignores SIGTERM without a signal handler, and the init passes the signal on, so that docker compose down and docker compose stop finish in seconds instead of waiting for the 10-second deadline.
The database healthcheck uses pg_isready -h 127.0.0.1, with the TCP address explicit. On first startup, the PostgreSQL image brings up a temporary server that listens only on a Unix socket while it prepares the database. Without the -h, pg_isready queries that socket and may answer "ready" before the final server accepts TCP connections, which is the path the API uses. With the explicit address, the test only passes when the database is actually serving over TCP.
Production checklist. Before putting any container into production, a last review is worthwhile. The capstone covers each item below, and the file shows where:
- Optimized image: avoid generic, heavy images (such as
node:latest); preferslim/alpinevariants or a multistage, so that only the essentials go to production. Covered by theDockerfile. - Sensitive variables kept safe: passwords and tokens via
secrets:, and not viaenv_fileor directly in Compose. Covered by thesecretsblock. - Resource limits: CPU and memory defined so as not to overload the host. Covered by
cpusandmem_limit. - Healthcheck configured: serves as an alert and gives the orchestrator the restart criterion. Covered by the two
healthcheckblocks. - Structured log: the application writes JSON to stdout, ready for an observability stack (Stage 12). Covered by
server.js. - Unprivileged user:
USER nodein the Dockerfile. Covered. - Isolated network: a specific network between services, instead of the default bridge. Covered by the
internanetwork. - Persistence guaranteed: volume so that no important data is lost on a restart. Covered by
dados_db. - Labels and metadata: make automation and integration with monitoring tools easier. Covered by the
labels. - Final local test: simulate the production environment locally, combining the files (
docker compose -f compose.yaml -f compose.prod.yaml up) before deploying for real. See the last step of the "Hands-on" section.
The limits can also be written in the Compose deploy.resources.limits format, which the bibliography uses:
services:api:deploy:resources:limits:# Half a CPU and 512 MB of memory.cpus: "0.50"memory: 512M
Both formats are accepted by Compose v2; this guide uses cpus and mem_limit. Check the result with docker compose config.
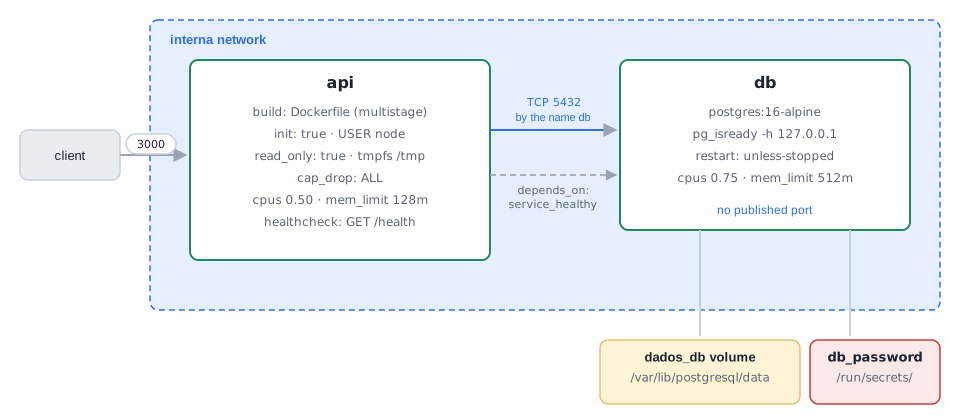
interna network, the data lives in the volume and the password arrives as a file in /run/secrets/.Diagram: made for this guideKey concepts
Stack
API, database, network, volume and secret described together.
Dependency on health
depends_on with condition: service_healthy waits for readiness, and not just creation.
Reduced privileges
cap_drop: ALL, read_only: true, tmpfs at /tmp, USER node.
init: true
an init as PID 1 passes SIGTERM on to Node and speeds up shutdown.
Secret in a file
POSTGRES_PASSWORD_FILE points to /run/secrets/db_password.
interna network
DNS by service name, without publishing the database.
Resource limits
contain consumption, without reserving capacity.
Labels
inventory metadata, and not a security control.
pg_isready -h 127.0.0.1
checks the database over the same TCP path the API uses.
Worked examples
Structure:
capstone/├── app/│ └── server.js├── secrets/│ └── db_password.txt├── .dockerignore├── Dockerfile└── compose.yaml
app/server.js:
Essential commands for this stage
capstone_dados_db volume (prefix = folder name) still existsdocker compose start db: stop and resume the database, to test the reaction of the API's healthcheckHands-on
- Create the structure and the files exactly as shown.
- Write a lab password with
mkdir -p secrets && printf 'troque-esta-senha' > secrets/db_password.txt && chmod 644 secrets/db_password.txt. Thechmod 644matters because Postgres reads the file as thepostgresuser inside the container; with a restrictiveumaskon the host, the file would be born readable only by you and the read could fail. - Validate the YAML with
docker compose config --quiet. - Bring up the stack with
docker compose up --detach --build --wait. - Run
curl http://localhost:3000/health. - The expected output is
{"service":"api","database":"reachable"}. - Run
docker compose psand confirm that both services are healthy. - Run
docker compose logs apiand locate the request's JSON log. - Confirm the user with
docker compose exec api id. The output should identify the usernode, notroot. - Run
docker compose down, bring it up again and confirm that the volumecapstone_dados_db(the prefix is the name of your folder) still exists withdocker volume ls. Also notice that thedownfinishes in a few seconds, thanks toinit: true. - If you want to preserve the database, end only with
docker compose down. Usedocker compose down --volumesonly when you decide to discard the lab: that command removes the volumecapstone_dados_dband permanently deletes its contents, with no trash bin or automatic recovery. Back up first if there is any data you need. - To close item 10 of the production checklist, write a minimal
compose.prod.yaml(for example, changingrestartor adding a labelambiente: producao), validate withdocker compose -f compose.yaml -f compose.prod.yaml configand bring it up with-fon both files before considering the environment ready. - Extra, losing the database and coming back: with the stack up (
docker compose up --detach --build --wait), confirm the initial state withdocker compose ps. API and database should appear ashealthy. - Extra: stop the API's real dependency with
docker compose stop db. - Extra: follow
docker compose psuntil the API appears asunhealthy. The endpoint returns 503 because the TCP test to the database fails, andcurl -i http://localhost:3000/healthshowsHTTP/1.1 503with{"service":"api","database":"unreachable"}. - Extra: look up the attempts with
docker inspect --format '{{json .State.Health}}' $(docker compose ps -q api)and correlate withdocker compose logs api, where theerror-level lines appear. - Extra: recover the database with
docker compose start dband wait for both services to return tohealthyindocker compose ps.
Tip: After finishing the capstone, repeat it causing a failure on purpose: stop the database, remove the volume, change the password. If you can predict and explain each response of the system (state, healthcheck, logs), you have understood how the pieces work together.
Takeaway: A mature stack does not depend on a single resource: it combines reproducible building, isolation, least privilege, persistence, health and operational evidence.
Stage 14 · review
Self-assessment checklist
Stage 01: Why containers exist
- I can explain why a container is not a small VM.
- I can state the role of namespaces and cgroups.
- I can explain why the main process determines the life of the container.
- I saw PID and hostname isolation and read a memory limit recorded on a container.
Stage 02: Image, container and lifecycle
- I tell image, layer and container apart.
- I ran the
pull,run,stop,startandrmcycle and confirmed that the image survives the container. - I can explain why
latestand other tags do not guarantee reproducibility and what a digest solves. - I can tell a public registry from a private one and describe the
login,tagandpushflow. - I used
docker exec,docker cpanddocker renameon a running container.
Stage 03: Dockerfile
- I can build and version an image with a Dockerfile.
- I tell
RUN,CMD,EXPOSEand--publishapart. - I replaced an image's
CMDon the command line without rebuilding it. - I can end a container in the foreground and explain why
--inithelps Node as PID 1.
Stage 04: Layers, cache and multistage
- I can organize a Dockerfile to take advantage of the cache.
- I observed
CACHEDand caused cache invalidation by reversing the order of the instructions. - I understand when to choose
slim,alpine,distrolessor a more complete image. - I can explain the benefit of a multistage build and the care needed with runtime dependencies.
Stage 05: Persistence
- I can choose between volume, bind mount and tmpfs.
- I showed that data in a volume survives the removal of the container and that data in tmpfs does not survive even a restart.
- I can explain what changes when using a remote driver (NFS or plugin) instead of
local.
Stage 06: Networks
- I can connect services by name on a custom network.
- I showed the difference between the default bridge and a custom network regarding name resolution.
- I publish only the ports that need to leave the internal network.
- I can say when to use
host,noneandoverlay.
Stage 07: Docker Compose
- I can validate, start, observe and tear down a Compose application.
- I can explain what
depends_onguarantees and what it does not. - I can use
buildwithcontext,dockerfileandargs.
Stage 08: Environments, restart, scaling and CI
- I can combine Compose files for different environments and check the result with
config. - I can say when the override is loaded automatically and when it is not.
- I understand that restart does not guarantee the readiness of dependencies.
- I saw a fixed port prevent replicas on the same host.
- I can describe a CI script that starts, tests and tears down the environment.
Stage 09: Security
- I can configure a non-root user, a read-only filesystem and minimal capabilities.
- I proved
--read-onlyas root, comparing with and without the option. - I can state the role of capabilities, seccomp and least privilege.
- I can solve permission problems on bind mounts with
--userand I know why not to mountdocker.sock.
Stage 10: Context, secrets and analysis
- I know why
.envand secrets must not enter the build context. - I saw the context size drop with the
.dockerignore. - I can explain why deleting a secret in a later layer does not remove it from the image, and I extracted the secret from the layer with
docker save. - I tell
ARG,env_fileandsecretsapart. - I know what Dive and Snyk are for.
Stage 11: Troubleshooting
- I can investigate a failure using status, logs, inspect and events, in that order.
- I can interpret the exit codes 0, 125, 126, 127 and 137 and check
OOMKilled, knowing that 137 also appears when adocker stoptimes out.
Stage 12: Logs, healthcheck and readiness
- I tell an active process from a healthy service.
- I saw a container go through
starting,unhealthyandhealthy. - I can explain how structured logs help centralization and search.
Stage 13: Capstone
- I completed the capstone and can justify each Compose decision.
- I mapped each item of the production checklist to a line of the file.
- I stopped the database, saw the API become
unhealthyand saw it return tohealthywhen the database came back.
Next steps: with all the items checked, redo the labs without consulting the guide and then put the pieces together. Cause failures in the capstone (stop the database, change the password, remove the volume) and explain each response of the system before looking at the logs. Then add a third service (for example, a cache) and take the same stack to a CI flow with docker compose up --wait.
Teacher's notes: technical precisions
- This block gathers the corrections made to the raw material and the details that help read the examples safely. Nothing here changes the path of the exercises.
- Corrections to the raw material
- The container's root is not the host's root. The raw text states that root inside the container is "practically the same" as the host's. Namespaces and capabilities reduce its powers. Even so, running as UID 0 widens the impact of dangerous mounts, extra capabilities and runtime flaws, which is why the guide recommends a non-root user.
- User namespace is not the default. The raw text presents the user namespace as if every container had user IDs separate from the host's. In Docker's default configuration, the container's UID 0 corresponds to the host's UID 0 (with reduced capabilities); the mapping only exists if
userns-remapor rootless mode is enabled. That is why, without--user, a bind mount creates files owned by the host's root (Stage 09). - `tmpfs` is not a persistent volume driver. The raw text lists it among the volume drivers. It is an in-memory mount that loses its content when removed.
- The default bridge has no DNS by name. The raw text says the default bridge network provides name resolution. That resolution is an advantage of user-created networks; on the default bridge, do not depend on it (Stage 06).
- Overlay belongs to Docker Swarm. The raw text associates overlay networks with Swarm or Kubernetes. Kubernetes does not use Docker overlay networks; it uses its own network plugins (CNI). The guide mentions overlay only as Swarm's multi-host network.
- Google Container Registry. The service cited in the raw text was replaced by Artifact Registry; the guide uses the name of the replacement service.
- `docker-compose` with a hyphen. The raw text's examples use the first-generation executable. The guide uses
docker compose(Compose v2) throughout. The namedocker-compose.ymlis still accepted, butcompose.yamlis the preferred name. - Cache example with pnpm. The raw text copies only
pnpm-lock.yamlbeforepnpm install, but the manager also needs thepackage.json. The guide copies both and uses--frozen-lockfile. - Order of `USER` in the Dockerfile. The raw text's example switches to the ordinary user before
RUN npm ci. Since the directory created byWORKDIRmay be owned by root, the installation may fail on permissions. The guide installs the dependencies beforeUSERand usesCOPY --chown. - Multistage and dependencies. The raw text copies only
/app/distto the runtime with no caveat. That only works if the artifact is self-sufficient; otherwise, the final stage needs its ownnpm ci --omit=dev. - Alpine size. The raw text says "under 10 MB" in one lesson and "about 5 MB" in another. The guide says "a few megabytes", since the value varies between versions.
- Cgroups and network. The raw text includes network bandwidth among the resources controlled by cgroups. Docker exposes CPU, memory and disk input and output limits through flags; the guide restricts itself to those.
- `env_file` and versioning. The raw text suggests
env_filefor values that "you need to version"..envfiles with credentials must not be versioned, andenv_filevalues are visible indocker inspect. - Promtail. The raw text presents it as Loki's agent. It is the historical agent, and Grafana has started pointing to another collector; since this recommendation may change, the guide asks you to check in the documentation which agent it indicates.
- Extraction errors. Commands such as
dockerpull,dockerinspectanddocker-composeupappear with lost spaces in the raw text, and the-aoption ofdocker psappears with a long typographic hyphen in place of the plain hyphen. The guide restores them todocker pull,docker inspect,docker ps -aanddocker compose up. - About what you will see in the terminal
- Example outputs. The outputs shown are typical formats. IDs, times, sizes, IPs and versions vary. Compare the structure, not the exact text.
- Image tags. The Node tags
lts-alpineandlts-slimfollow the current LTS version, which keeps the exercises from aging, but makes them movable: in a project, pin the major version. Thepostgres:16-alpineimage must keep the chosen major version, because the data files are not compatible between major versions. Check the availability of third-party images (such ascurlimages/curl) at the time you run them. - Writable layer and `docker cp`. Files copied into a container stay in the writable layer and vanish with it; to persist, use volumes.
- Resource limits.
cpusandmem_limit(ordeploy.resources.limits) contain consumption, but do not reserve exclusive capacity nor replace monitoring. - A label is metadata, not a security control. It helps inventory, automation and observability, but does not enforce isolation or authorization.
- Secrets in local Compose.
secretsmounts the value as a file and reduces exposure, but is not an encrypted vault; the source file still needs protection. - `ARG` is not a secret. Build values can appear in history, metadata and pipeline records. For build secrets, there is a dedicated BuildKit mechanism.
- PID 1, signals and `--init`. On Linux, PID 1 of a process namespace does not get the default action of signals: SIGTERM and SIGINT are ignored if the program has not installed a handler. Node.js without an explicit handler is affected, so Ctrl+C may not end a container in the foreground and
docker stopwaits 10 seconds before sending SIGKILL.--init(andinit: truein Compose) solves this with an init that passes the signals on. An alternative is to handle the signal in code, with something likeprocess.on("SIGTERM", () => server.close(() => process.exit(0))). - 137 has two origins. Exit code 137 means SIGKILL. It appears with lack of memory (with
OOMKilled=true) and also when adocker stoptimes out and Docker kills the process (withOOMKilled=false). Whoever read "137" as lack of memory needs to checkOOMKilledbefore concluding. - tmpfs and swap. A tmpfs lives in memory, but, under memory pressure, the system may move its pages to the swap area, which is why it is not an absolute guarantee that the data never reaches the disk.
- Incremental build context. BuildKit transfers the context incrementally: on the second run of a build, only the differences are sent. That is why the
.dockerignoreexercise in Stage 10 asks for the first build, with the large file, to be done only once before creating the.dockerignore. - Sizes in `docker history`. Depending on the version and the image store Docker uses (the classic one or containerd's), layer sizes may appear rounded or in another unit. The reading that matters is the comparison: the
COPYlayer is larger than0Band theRUN rmone stays at0B. - `pg_isready` and the temporary server. On first startup, the official PostgreSQL image runs a temporary server only on a Unix socket, restarts and then starts listening on TCP. A
pg_isreadywithout-hmay report readiness in that phase; with-h 127.0.0.1, the test reflects the TCP path used by the API. - Points to check for whoever runs it
- Docker Desktop. Linux containers run inside a VM. The
hostnetwork mode and the translation of file owners on bind mounts behave differently from native Linux (Stages 06 and 09). - Restart and counting. The number of restarts shown in Stage 08 (
reinicios=3) and the number of log lines depend on how long you wait before querying; wait a few seconds before inspecting. - External services. The
docker push(Stage 02) requires a real registry, the NFS volume (Stage 05) requires an accessible NFS server, Snyk (Stage 10) requires an account, and Dive requires installation. The other exercises do not depend on them. - Ports in use. The examples use host ports 3000 and 8080. If either is busy, change the left side of the mapping (for example,
3001:3000) and adjust thecurl. - Minimal images and diagnosis. Alpine, slim and distroless reduce size and surface, but compatibility and diagnostic ability must also be considered; an image without a shell does not accept
docker exec ... sh. - Layer extraction with `docker save`. The format of the exported file changes with the Docker version (layers in their own directories or in
blobs/, with or without compression). The Stage 10 script walks through all the files precisely so as not to depend on that layout; iftardoes not find the path, try the./tmp/segredo.txtvariant.